Espressif ESP8266 RTOS Integration Guide
Overview
In this guide, we will walk through the steps for integrating the Memfault Firmware SDK into a project using Espressif's ESP8266 RTOS SDK. The integration has been tested against the v3.3 release.
Upon completion of the integration, the following subcomponents will be added to your system!


Integration Steps
This tutorial assumes you have a working ESP8266 RTOS SDK environment and are able to flash a board supported by the SDK.
Add memfault-firmware-sdk and prepare port
You will first need to add the memfault-firmware-sdk to your projects.
$ cd ${YOUR_APP_ROOT_DIRECTORY}
$ mkdir -p components/memfault_port/config
$ echo $'COMPONENT_ADD_INCLUDEDIRS := config\n' > components/memfault_port/component.mk
$ touch components/memfault_port/memfault_port.c
$ touch components/memfault_port/config/memfault_platform_config.h
$ touch components/memfault_port/config/memfault_metrics_heartbeat_config.def
$ touch components/memfault_port/config/memfault_trace_reason_user_config.def
$ git submodule add https://github.com/memfault/memfault-firmware-sdk.git \
  components/memfault_port/memfault-firmware-sdk
When done, you should see the following directory structure:
components/memfault_port/
├── component.mk
├── config
│   ├── memfault_platform_config.h
│   ├── memfault_metrics_heartbeat_config.def
│   └── memfault_trace_reason_user_config.def
├── memfault-firmware-sdk
└── memfault_port.c
Add EXTRA_COMPONENT_DIRS to Project Makefile
First, update the Makefile for your project to pick up the Memfault ESP8266
port
diff --git a/Makefile b/Makefile
index 952298b..d97ce01 100644
--- a/Makefile
+++ b/Makefile
@@ -5,5 +5,8 @@

+ EXTRA_COMPONENT_DIRS += \
+  components/memfault_port/memfault-firmware-sdk/ports/esp8266_sdk/memfault \
+  components/memfault_port/memfault-firmware-sdk/ports/esp8266_sdk/memfault_freertos

include $(IDF_PATH)/make/project.mk
Apply Patches to ESP8266 RTOS SDK
There are two small updates to make to the ESP8266 RTOS SDK. These can be added using git apply:
$ cd ${IDF_PATH}
$ git apply ${MEMFAULT_FIRMWARE_SDK}/ports/esp8266_sdk/esp8266_v33_rtos.patch
The patch does two things:
- Installs a facility to capture RTOS task creation
- Adds a unique identifier to image so Memfault can perform accurate stack unwinds
diff --git a/components/freertos/port/esp8266/include/freertos/FreeRTOSConfig.h b/components/freertos/port/esp8266/include/freertos/FreeRTOSConfig.h
index 080ce65c..cca3a354 100644
--- a/components/freertos/port/esp8266/include/freertos/FreeRTOSConfig.h
+++ b/components/freertos/port/esp8266/include/freertos/FreeRTOSConfig.h
@@ -31,6 +31,11 @@

 #include "sdkconfig.h"

+#ifdef CONFIG_MEMFAULT
+#include "memfault/ports/freertos_trace.h"
+#define INCLUDE_xTaskGetHandle 1
+#endif
+
 #ifndef __ASSEMBLER__
 #include <stdlib.h>
 #include "rom/ets_sys.h"
diff --git a/make/project.mk b/make/project.mk
index c06835b2..681db825 100644
--- a/make/project.mk
+++ b/make/project.mk
@@ -508,7 +508,12 @@ COMPONENT_LINKER_DEPS ?=
 $(APP_ELF): $(foreach libcomp,$(COMPONENT_LIBRARIES),$(BUILD_DIR_BASE)/$(libcomp)/lib$(libcomp).a) $(COMPONENT_LINKER_DEPS) $(COMPONENT_PROJECT_VARS)
    $(summary) LD $(patsubst $(PWD)/%,%,$@)
    $(CC) $(LDFLAGS) -o $@ -Wl,-Map=$(APP_MAP)
-
+ifndef IS_BOOTLOADER_BUILD
+ifdef CONFIG_MEMFAULT
+	$(summary) Adding Unique Build Id
+	$(PYTHON) $(PROJECT_PATH)/components/memfault_port/memfault-firmware-sdk/scripts/fw_build_id.py $@
+endif
+endif
 app: $(APP_BIN) partition_table_get_info
 ifeq ("$(CONFIG_SECURE_BOOT_ENABLED)$(CONFIG_SECURE_BOOT_BUILD_SIGNED_BINARIES)","y") # secure boot enabled, but remote sign app image
    @echo "App built but not signed. Signing step via espsecure.py:"
Create a Project and get a Project Key
Go to app.memfault.com and from the "Select A Project" dropdown, click on "Create Project" to setup your first project. Choose a name that reflects your product, such as "smart-sink-dev".
Once you've created your project, you'll be automatically taken to an page that includes your project key. Copy the key and follow the rest of this guide.
Implement Platform Dependencies
In order to save traces, you will need to implement a dependency function that
tells memfault version information. You can copy the following template into the
memfault_port.c file created in the first step:
Be sure to fill in the appropriate.
//! @file components/memfault_port/memfault_port.c

#include "memfault/components.h"

#include <stdio.h>

#include "memfault/esp8266_port/core.h"

sMfltHttpClientConfig g_mflt_http_client_config = {
  .api_key = "YOUR_PROJECT_KEY",
};

static char s_fw_version[32];

void memfault_platform_get_device_info(sMemfaultDeviceInfo *info) {
  if (s_fw_version[0] == 0) {
    // initialize version
    char build_id[7];
    memfault_build_id_get_string(build_id, sizeof(build_id));
    snprintf(s_fw_version, sizeof(s_fw_version), "1.0.0+%s", build_id);
  }

  // platform specific version information. For more details
  // see https://mflt.io/version-nomenclature
  *info = (sMemfaultDeviceInfo) {
    .device_serial = "DEMOSERIAL",
    .software_type = "app-fw",
    .software_version = s_fw_version,
    .hardware_version = "dvt",
  };
}

int memfault_platform_boot(void) {
  memfault_esp_port_boot();
  return 0;
}
Initialize the Memfault platform from app_main()
Add a call to memfault_platform_boot() from your app_main()
//! your_project_main.c

#include "memfault/components.h"

// ...

void app_main()
{

  memfault_platform_boot();
  // ...

}
Periodically post data to Memfault
From a background task, periodically try sending data to Memfault when the
device is connected to Wi-Fi by calling
#include "memfault/esp8266_port/http_client.h". This routine will issue an
HTTPS request if and only if there is new Memfault data to send.
#include "memfault/esp8266_port/http_client.h"

void your_background_task(void) {
   memfault_esp_port_http_client_post_data();
}
For testing, you can also force a post immediately by using the
mflt post_chunks CLI command
Force a Crash and Upload to Memfault
Example crashes can be generated using the crash CLI:
esp8266> crash
Saving Memfault Coredump!
...
I (340) mflt: Memfault Build ID: 134cc1627c9a84c36bdba206b6d96940b6aae698
I (362) mflt: Coredumps will be saved at 0x110000 (524288B)
I (366) mflt: ESP Reset Cause 0x7
I (369) mflt: Reset Causes:

This is an example of ESP-IDF console component.
Type 'help' to get the list of commands.
Use UP/DOWN arrows to navigate through command history.
Press TAB when typing command name to auto-complete.
esp8266>
esp8266> join <your_network> <your_network_password>
esp8266> post_chunks
D (24436) mflt: Posting Memfault Data
D (27019) mflt: Posting Memfault Data Complete!
I (27023) mflt: Result: 0
Test Tip
Data can also be dumped out over the CLI using the mflt export_data CLI
command.
esp8266> export_data
I (57880) mflt: MC:CAKmAgEDAQpmYXBwLWZ3CWwxLjAuMCsxMzRjYzEGY2R2dAShAYUZ00oAAAAAG4c=:
The CLI output can then be saved to a file and the "chunk" data can be posted to the Memfault Cloud using the Memfault CLI tool:
$ memfault --project-key ${YOUR_PROJECT_KEY} post-chunk --encoding sdk_data_export cli-output.txt
Found 2 Chunks. Sending Data ...
Success
Upload Symbol File
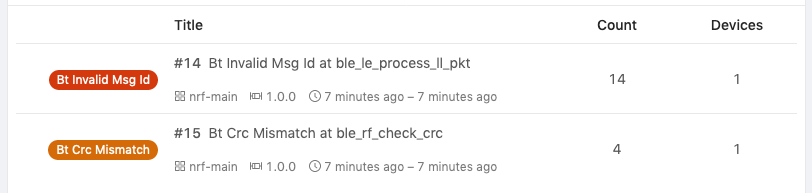
At this point, you should be able to generate a test Trace Event and push it to the Memfault UI. You can confirm the issue has arrived successfully by navigating to the "Issues" page. Follow the link pointed to below and upload a symbol file.
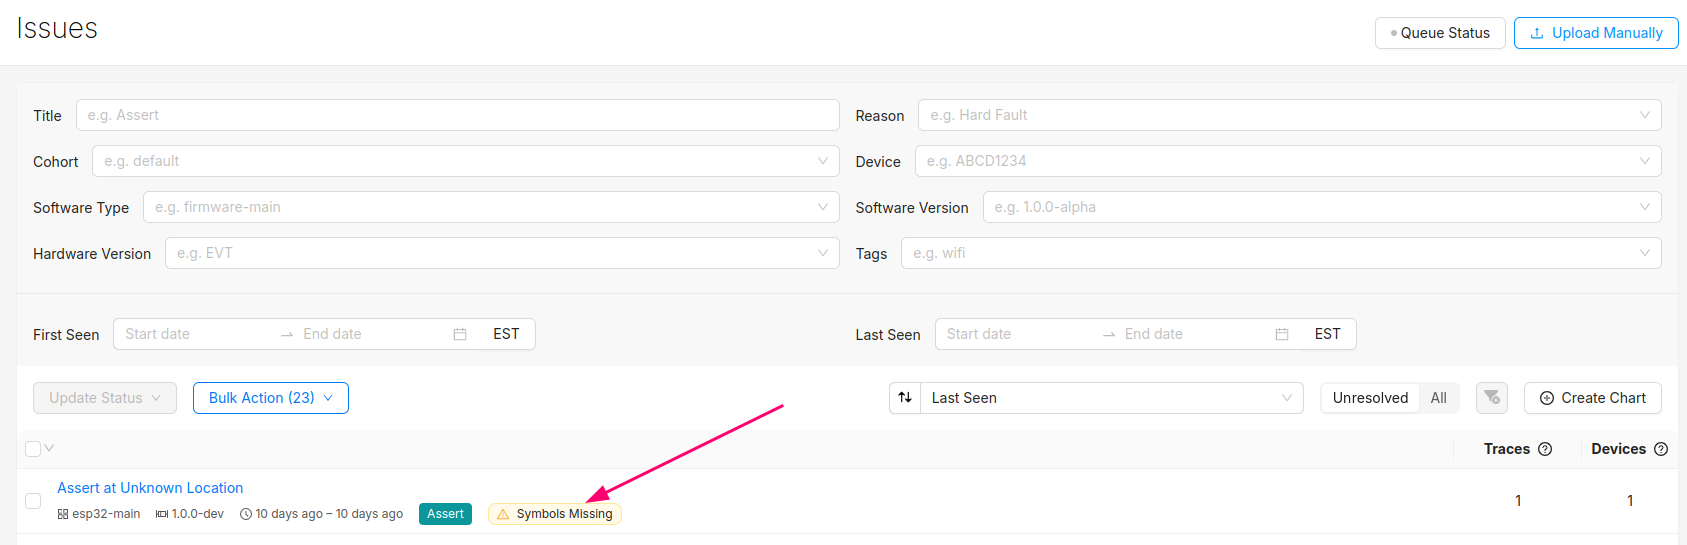
After this step, you will see the trace in the list of issues!
You can programmatically upload symbol files with the Memfault CLI tool.
Troubleshooting Data Transfer
If you encounter any issues in your data transfer implementation, Memfault has tools to help debug!
- To troubleshoot data not getting uploaded or processed correctly by the Memfault cloud, take a look at the Integration Hub → Processing Log view. This provides a filterable, chronological view of recent errors that have occurred while processing received data. See this documentation page for more information on the Integration Hub.
- A view you can use toview the raw "Chunk" data payloadsthat have arrived for your project.
- Precanned Data Payloads you can pass through your `user_transport_send_chunk_data()` implementation to test data transfer in isolation.
- Server-side rate limiting will apply to the device you're using to work on the integration process. Once you can see the device on the Memfault Web App, consider enabling Server-Side Developer Mode for it on the Memfault Web App to temporarily bypass these limits.