Nordic Cellular Quickstart (nRF91 Series)
This quickstart guide shows how to integrate and verify the Memfault SDK with the Nordic nRF91 series SOCs, using the Nordic nRF-Connect SDK (NCS).
Find a fully-featured sample application for the nRF91 series here:
Memfault Firmware SDK -> Examples -> nRF-Connect SDK -> Cellular
Create your nRF Cloud account
Register for an nRF Cloud account to get started. Once registered, select your Nordic chip variant and a Project will be automatically created for you.
Already have an nRF Cloud account without Memfault access? Create a new account or contact us for support.
Set up the SDK
The nRF Connect SDK embeds the Memfault SDK as a module:
    - name: memfault-firmware-sdk
      path: modules/lib/memfault-firmware-sdk
      revision: 1.28.0
      remote: memfault
Therefore, adding Memfault to your project only requires adding some Kconfig settings to the application!
Memfault recommends updating the Memfault SDK version that is included with your
version of NCS, to take advantage of the latest Memfault features and bug fixes. To update the Memfault SDK without updating the nRF Connect SDK, you can add the
Memfault SDK as a module in your application's Zephyr's After updating the West Manifest, run 👉 Memfault recommends using the
T2 topology
where the project or application is the manifest repository. An example
directory structure for this kind of workspace is: Note that in this structure, any number of applications can live in
Upgrade the Memfault SDK
west.yml:west tool will use the explicitly listed version of the
memfault-firmware-sdk module instead of the one specified by the
nrf-connect-sdk module. Reference:west update👈 to pull in the Memfault
SDK. Double check that you see the SDK source folder memfault-firmware-sdk
under modules/lib/. You can manually check the version of the SDK with the
following command (run from the West workspace root): Details on Recommended Zephyr Workspace Topology
project-dir. This works well for any projects that use a monorepo where
sources for multiple firmware targets live, and they can share dependencies
controlled via west (e.g. zephyr). In this case, the directory structure
would be:
Add the following code snippet to the project's prj.conf file (find your
Memfault project key here):
# Enable Memfault! 🎉
CONFIG_MEMFAULT=y
CONFIG_MEMFAULT_NCS_PROJECT_KEY="YOUR_PROJECT_KEY"
# Default to IMEI for Memfault serial number
CONFIG_MEMFAULT_NCS_DEVICE_ID_IMEI=y

# Enable the modem info library to allow Memfault to collect LTE metrics
CONFIG_MODEM_INFO=y

# Enable these for testing the integration
CONFIG_SHELL=y
CONFIG_SHELL_BACKEND_SERIAL=y

# Disable the Host AT control of the serial port with CONFIG_AT_HOST_LIBRARY=n,
# so we can access the Zephyr shell for testing.
# Some nRF-Connect SDK examples will override this setting in board-specific
# config files. The easiest way to force it off (other than editing those files)
# is to pass it when running "west build", i.e.:
#  "west build ... -- -DCONFIG_AT_HOST_LIBRARY=n"
CONFIG_AT_HOST_LIBRARY=n
Uploading Memfault data directly from device uses HTTP. For production, data can be routed through an intermediate server if direct device-to-Memfault communication is undesirable. See Forwarding Data to Memfault for more information.
Perform a full rebuild of the project. This example is building the https_client example in the nRF-Connect SDK, targeting the nRF9160-DK board:
west build --pristine=always --board nrf9160dk@1.0.0/nrf9160/ns nrf/samples/net/https_client
Flash the board:
west flash --erase
Connect a serial console and confirm the Memfault shell command group is
available by running mflt help:
uart:~$ mflt help
mflt - Memfault Test Commands
Subcommands:
  clear_core          : clear coredump collected
  export              : dump chunks collected by Memfault SDK using
                       https://mflt.io/chunk-data-export
  get_core            : check if coredump is stored and present
  get_device_info     : display device information
  get_latest_release  : checks to see if new ota payload is available
  coredump_size       : print coredump computed size and storage capacity
  heartbeat_dump      : dump current Memfault metrics heartbeat state
  post_chunks         : Post Memfault data to cloud
  test                : commands to verify memfault data collection
                       (https://mflt.io/mcu-test-commands)
If you encounter configuration or other build errors, please contact us!
Hello, Memfault!
To start sending data to Memfault:
-
Upload the
build/https_client/zephyr/zephyr.elffile to Memfault by navigating to Software → Symbol Files, and clicking the "Upload Symbol File" button.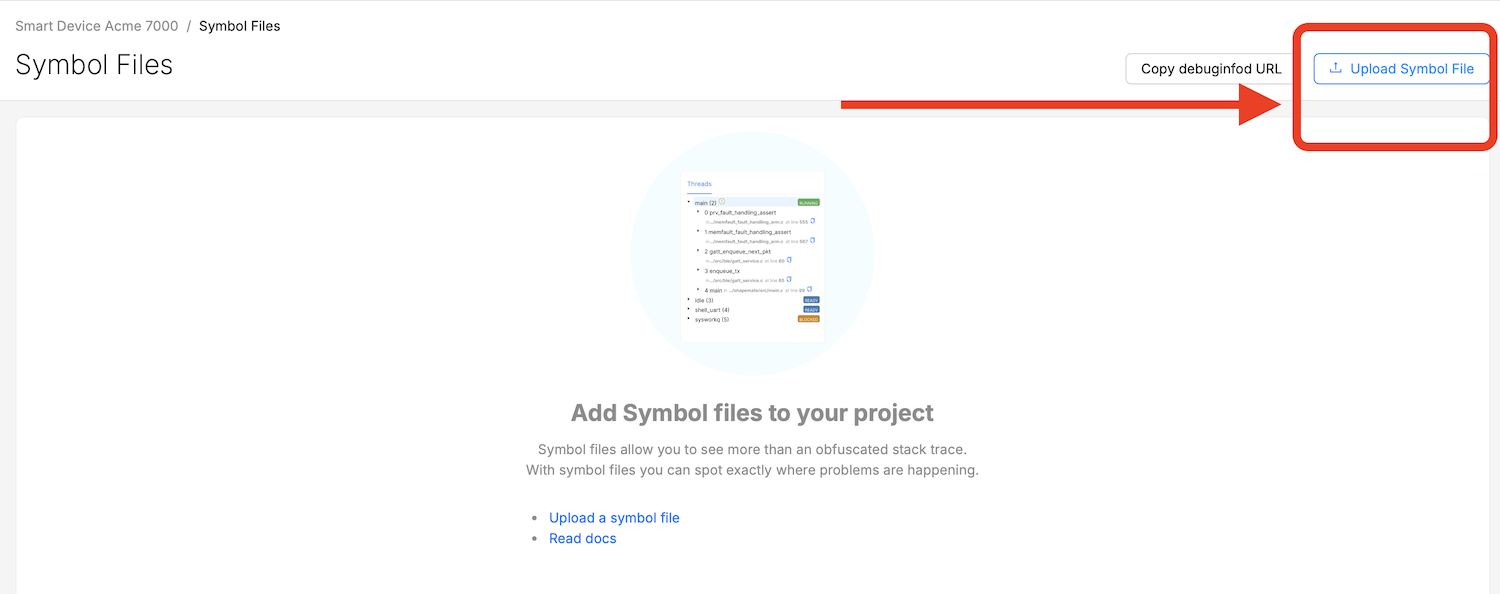
Screenshot of the Upload Symbol File button
tipIf there are code changes, make sure to always upload the Symbol file before sending data to Memfault.
-
Verify your connectivity - make sure the application is connecting to LTE after startup, and stays connected. In nRF-Connect SDK v2.6.0 and later, this is normally done using the
conn_mgr_all_if_up()andconn_mgr_all_if_connect()high level functions.The connection manager requires the following Kconfig flags (these are likely already set in your application):
CONFIG_NET_CONNECTION_MANAGER=y# At least one of the following (a dependency of the connection manager)CONFIG_NET_IPV4=yCONFIG_NET_IPV6=y -
Once the board is connected, use the
mflt post_chunkscommand to verify data can be successfully sent to Memfault. Any errors will show in the console log. No errors means that data was posted successfully!uart:~$ mflt post_chunks[00:05:24.401,428] <inf> mflt: Posting Memfault Data -
Check the Reboot Event. In the sidebar, navigate to Integration Hub → Processing Log. Look for the reboot event just uploaded from mflt post_chunks - it should look something like this:

Screenshot of the Processing Log
Investigate a Crash
-
Trigger a crash using the Memfault Zephyr Shell commands:
uart:~$ mflt test assert[00:00:25.440,000] <err> os: ***** USAGE FAULT *****[00:00:25.450,000] <err> os: Attempt to execute undefined instruction[00:00:25.450,000] <err> os: r0/a1: 0x00008001 r1/a2: 0x20002218 r2/a3: 0x20007348[00:00:25.450,000] <err> os: r3/a4: 0x0000f321 r12/ip: 0x00013edb r14/lr: 0x00007a3d[00:00:25.450,000] <err> os: xpsr: 0x21000000[00:00:25.450,000] <err> os: r4/v1: 0x00000000 r5/v2: 0x00000001 r6/v3: 0x00013edb[00:00:25.450,000] <err> os: r7/v4: 0x20002228 r8/v5: 0x200022a8 r9/v6: 0x00010de0[00:00:25.450,000] <err> os: r10/v7: 0x00000002 r11/v8: 0x00000000 psp: 0x200021f8[00:00:25.450,000] <err> os: EXC_RETURN: 0xfffffffd[00:00:25.450,000] <err> os: Faulting instruction address (r15/pc): 0x00007a3c -
Once the device reboots and connects to LTE, upload the data with the
mflt post_chunkscommand. -
Navigate back to the Processing Log, and confirm that a coredump was received. It can take up to 5 minutes for the coredump to appear:

Screenshot of the Processing Log showing a received coredump
-
In the Sidebar, navigate to the Issues page and see the coredump once it processes:

Screenshot of the Issue List
-
Click on its title to go through to the Trace view, and see details of the coredump:
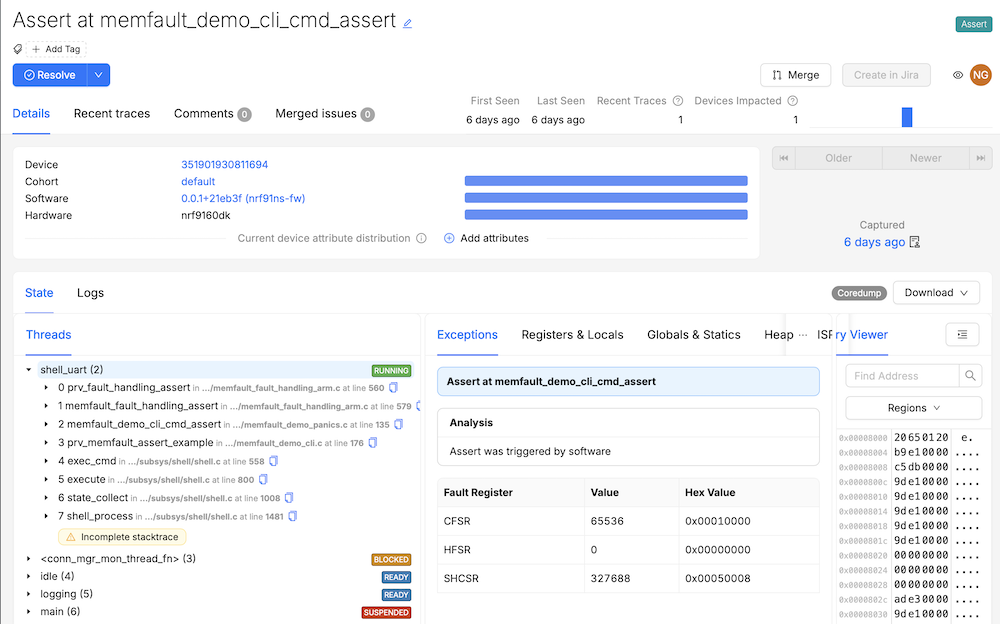
Screenshot of the Issue Detail view
Monitor the Fleet
Heartbeat Metrics are automatically collected by the Memfault SDK on an hourly interval. To verify metrics are working, trigger a Heartbeat and upload the data:
-
Run
mflt test heartbeatandmflt post_chunksto trigger and upload the heartbeat:uart:~$ mflt test heartbeatTriggering heartbeatuart:~$ mflt post_chunks[00:08:33.717,437] <inf> mflt: Posting Memfault Data -
Navigate to the Processing Log, and confirm the heartbeat appears. This can take up to 5 minutes.

Screenshot of the Processing Log showing a received heartbeat report
-
Click on Dashboards → Metrics, and inspect the aggregate metric charts (you may need to refresh the charts using the icon in the bottom left corner of each chart):
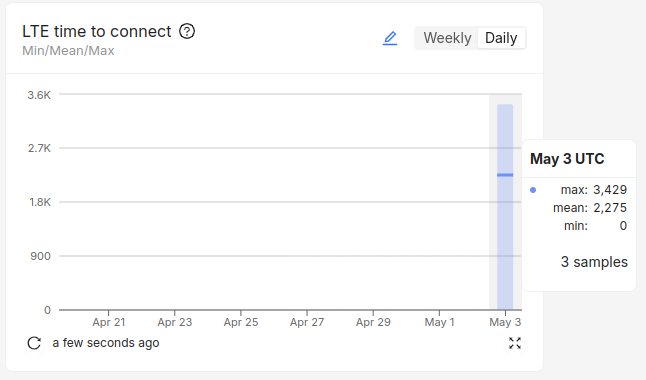
Screenshot of a dashboard card LTE time to connect graph
tipMake sure the matching Symbol File was uploaded before uploading the Heartbeat data! The Processing Log will show an error if the symbol was missing. To fix it, upload the symbol file, and re-run the steps above.
Examine a Device
Make sure that all the data you've uploaded so far is appearing on your Device's details page.
Note: this step should be run after a Heartbeat is uploaded in "Monitor the Fleet".
-
Navigate to the Fleet → Devices page, and select the device reporting in to view its Device Timeline.
-
Click on the sample in the Timeline to inspect the uploaded Heartbeat record. It should look something like this:

Screenshot of the device timeline
-
Click on the Traces tab to see the Trace you uploaded earlier:

Screenshot of traces tab
-
Click on the Reboots tab to see the Reboot you uploaded earlier:

Screenshot of reboots tab
Testing OTA
Before proceeding, configure OTA Kconfigs for your NCS version:
In NCS v3.0.0, the download client library was deprecated in favor of the downloader library. For more information on migrating to the downloader library, see the v3.0.0 migration guide.
- NCS v3.0.0 or later
- NCS <v3.0.0
# Subsystems to write OTA payloads to flash and update via MCUBoot
CONFIG_DFU_TARGET=y
CONFIG_DFU_TARGET_MCUBOOT=y
CONFIG_IMG_MANAGER=y
CONFIG_FLASH=y
CONFIG_FLASH_MAP=y
CONFIG_STREAM_FLASH=y
CONFIG_IMG_ERASE_PROGRESSIVELY=y

# Use NCS downloader APIs
CONFIG_FOTA_DOWNLOAD=y
CONFIG_DOWNLOADER=y
CONFIG_DOWNLOADER_MAX_FILENAME_SIZE=400
CONFIG_DOWNLOADER_STACK_SIZE=1600

# Print download progress to console
CONFIG_FOTA_DOWNLOAD_PROGRESS_EVT=y
# Subsystems to write OTA payloads to flash and update via MCUBoot
CONFIG_DFU_TARGET=y
CONFIG_DFU_TARGET_MCUBOOT=y
CONFIG_IMG_MANAGER=y
CONFIG_FLASH=y
CONFIG_FLASH_MAP=y
CONFIG_STREAM_FLASH=y
CONFIG_IMG_ERASE_PROGRESSIVELY=y

# Use NCS download_client APIs
CONFIG_FOTA_DOWNLOAD=y
CONFIG_DOWNLOAD_CLIENT=y
CONFIG_DOWNLOAD_CLIENT_STACK_SIZE=1600
CONFIG_DOWNLOAD_CLIENT_MAX_FILENAME_SIZE=400
CONFIG_DOWNLOAD_CLIENT_HTTP_FRAG_SIZE_1024=y

# Print download progress to console
CONFIG_FOTA_DOWNLOAD_PROGRESS_EVT=y
When CONFIG_MEMFAULT_USE_NRF_CLOUD_COAP=y, FOTA downloads are performed via
the nRF Cloud CoAP connection, including modem FOTA
(CONFIG_MEMFAULT_FOTA_MODEM_UPDATE=y).
Perform a full rebuild to pick up the new settings:
west build --pristine=always --board nrf9160dk_nrf9160_ns@1.0.0 nrf/samples/net/https_client
Flash the board, and using the mflt get_latest_url command, confirm that an
OTA check can be performed:
uart:~$ mflt get_latest_url
[00:00:25.525,970] ‹err> mflt: Unable to fetch OTA url, rv=0
Navigate to the Processing Log and confirm the OTA check event was recorded:

Screenshot of a Processing Log showing a OTA check for update event received
The Processing Log is a great place to start when testing any device operation that interacts with Memfault.
Now rebuild the firmware with a newer Software Version, using these Kconfig settings:
CONFIG_MEMFAULT_NCS_FW_VERSION_STATIC=y
# The default version will look like "0.0.1+c85ef3". This version is
# set to "newer" (higher precedence) to trigger an OTA.
CONFIG_MEMFAULT_NCS_FW_VERSION="0.0.2"
Build your firmware with the later version, and upload the OTA payload and matching symbols using the Memfault CLI:
memfault --project YOUR_PROJECT --org YOUR_ORG_SLUG \
  --org-token YOUR_ORG_TOKEN upload-ota-payload \
  --hardware-version nrf9160dk --software-version 0.0.2 \
  --software-type nrf91ns-fw build/https_client/zephyr/app_update.bin
memfault --project YOUR_PROJECT --org YOUR_ORG_SLUG \
  --org-token YOUR_ORG_TOKEN upload-symbols \
  --software-type nrf91ns-fw --software-version 0.0.2 \
  build/https_client/zephyr/zephyr.elf
The Memfault CLI requires installation and authentication. See the CLI installation guide and Organization Auth Token.
Go to Software → Releases in Memfault and find your new Release and click Activate.
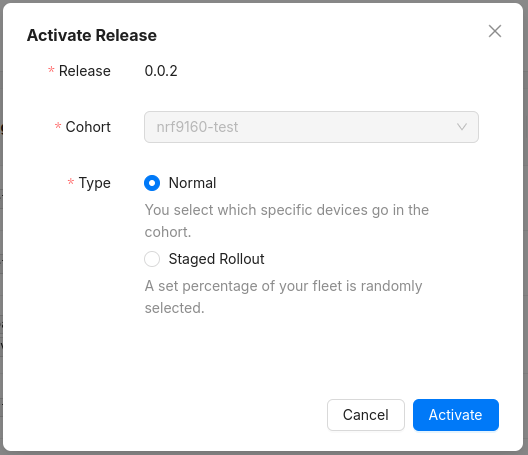
Screenshot of a Activate Release modal
Use the mflt get_latest_url command on the device to check that the OTA is
activated:
# If not OTA is available, rv=0
uart:~$ mflt get_latest_url
uart:~$ [00:02:35.962,371] <err> mflt: Unable to fetch OTA url, rv=0
# After activating the OTA, a payload URL is returned
uart:~$ mflt get_latest_url
Download URL: 'https://ota-cdn.memfault.com/693/130/14605210130?token=1K0Di8MzovgDIJxyO7Z09olIjD_d5_Uj3278KO1gCaA&expires=1714172400'
Use the mflt get_latest_release command to execute the OTA:
# The FOTA client will try a sequence of TLS certs during the download,
# so there may be "Unable to connect, errno 114" responses, these are
# normal.

uart:~$ mflt get_latest_release
[00:03:00.426,910] <inf> mflt: Checking for FOTA
uart:~$ [00:03:02.689,514] <inf> mflt: FOTA Update Available. Starting Download!
[00:03:02.690,338] <inf> download_client: Downloading: https://ota-cdn.memfault.com/693/130/14605211234?token=1K0Di8MzovgDIJxyO7Z09olIjD_d5_Uj3278KO1gCaA&expires=1714172400 [0]
[00:03:02.690,399] <inf> mflt: FOTA In Progress
[00:03:02.900,024] <inf> download_client: Setting up TLS credentials, sec tag count 3
[00:03:02.900,146] <inf> download_client: Connecting to 2400:52e0:1a00::718:1
[00:03:02.900,360] <err> download_client: Unable to connect, errno 114
[00:03:03.006,317] <inf> download_client: Setting up TLS credentials, sec tag count 3
[00:03:03.006,439] <inf> download_client: Connecting to 169.150.236.100
[00:03:04.660,308] <inf> download_client: Downloaded 1024/250791 bytes (0%)
[00:03:05.184,417] <inf> download_client: Downloaded 2048/250791 bytes (0%)
[00:03:05.411,560] <inf> download_client: Downloaded 3072/250791 bytes (1%)
...
[00:04:17.788,665] <inf> download_client: Downloaded 248832/250791 bytes (99%)
*** Booting nRF Connect SDK d96769faceca ***
I: Starting bootloader
After the update downloads and installs, the board will reboot. Use the
mflt get_device_info command to check the new version was installed:
uart:~$ mflt get_device_info
[00:00:09.159,088] <inf> mflt: S/N: 352656106683967
[00:00:09.159,149] <inf> mflt: SW type: nrf91ns-fw
[00:00:09.159,210] <inf> mflt: SW version: 0.0.2
[00:00:09.159,271] <inf> mflt: HW version: nrf9160dk
Celebrate, your device has completed an OTA! 🎉