NXP MCUXpresso Getting Started Guide for ARM
This tutorial will go over integrating the Memfault Firmware SDK into an NXP i.MX RT1060 project using NXP's MCUXpresso IDE.
Note: these instructions were written using mcuxpressoide-11.4.0_6224.x86_64
on ubuntu 22.04, using the
MIMXRT1060-EVKB
The full example project can be found here: https://github.com/memfault/mcuxpresso-rt1060-example
These instructions should also apply to other NXP RT family boards (ex: MIMXRT1020-EVK), though there may be adjustments needed to the reset logic or linker script.
Overview
This document describes how to add the Memfault SDK to an MCUXpresso project. The strategy documented here follows these high-level steps:
Part 1: generate a sample project
- Download MCUXpresso SDK from NXP
- Generate a sample project from that SDK
Part 2: add the Memfault SDK
- Add the Memfault SDK sources to the project using the
eclipse_patch.pyscript from the Memfault SDK - Configure a few build settings (gnu Build ID, debug level)
- (Optional, for i.MX RT1060 network demo) Add the example HTTPS client port and associated application changes for the i.MX RT1060 LwIP project, and configure Memfault Project Key for uploading Memfault data from the EVK
Part 1: Setup and Verify LwIP Sample Application
👉 This section describes setting up the lwip_httpscli_mbedTLS_freertos sample
project provided by the NXP SDK.
The integration steps in Part 2 can be applied to other projects (including projects not based on an NXP sample), so skip to that section if necessary.
-
Install mcuxpresso: https://www.nxp.com/design/software/development-software/mcuxpresso-software-and-tools-/mcuxpresso-integrated-development-environment-ide:MCUXpresso-IDE
-
Download the SDK for the MIMXRT1060-EVKB (requires login to nxp.com): select all to download all components, and select "mcuxpresso" as the target toolchain. This example used the specific SDK version:
SDK_2.10.1_MIMXRT1060-EVKB(NOTE: v2.11.1 was not compatible with MCUXpresso v11.4.0)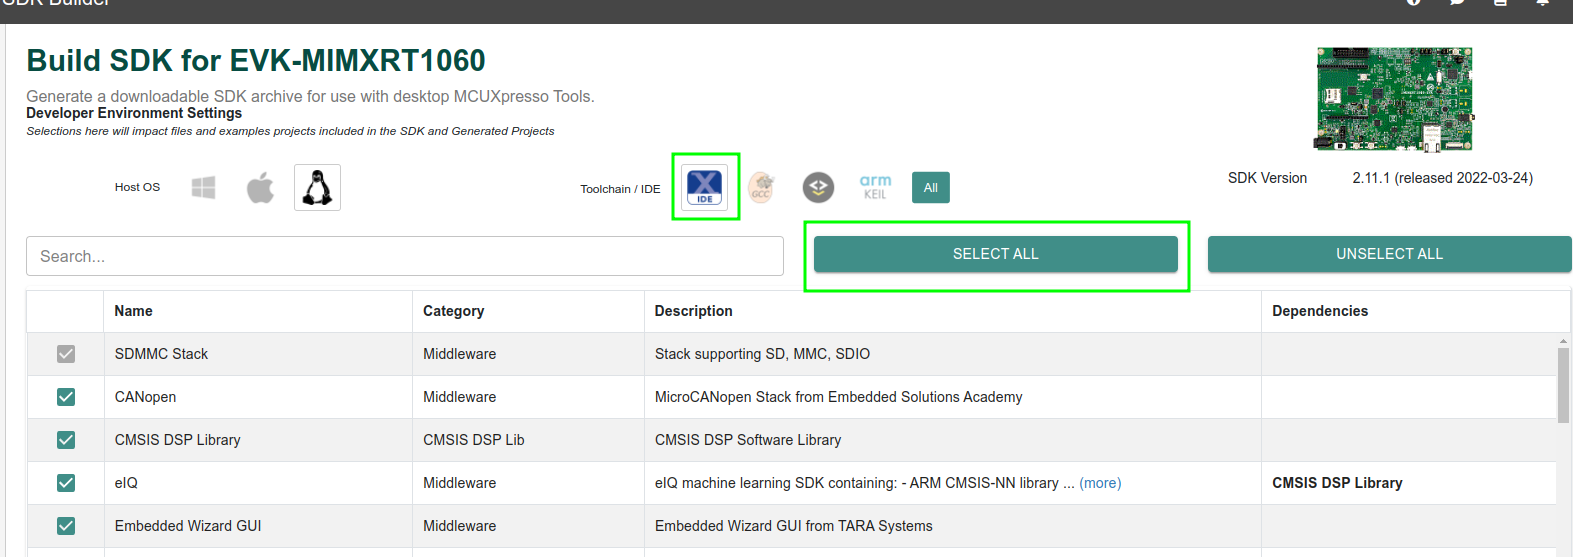
-
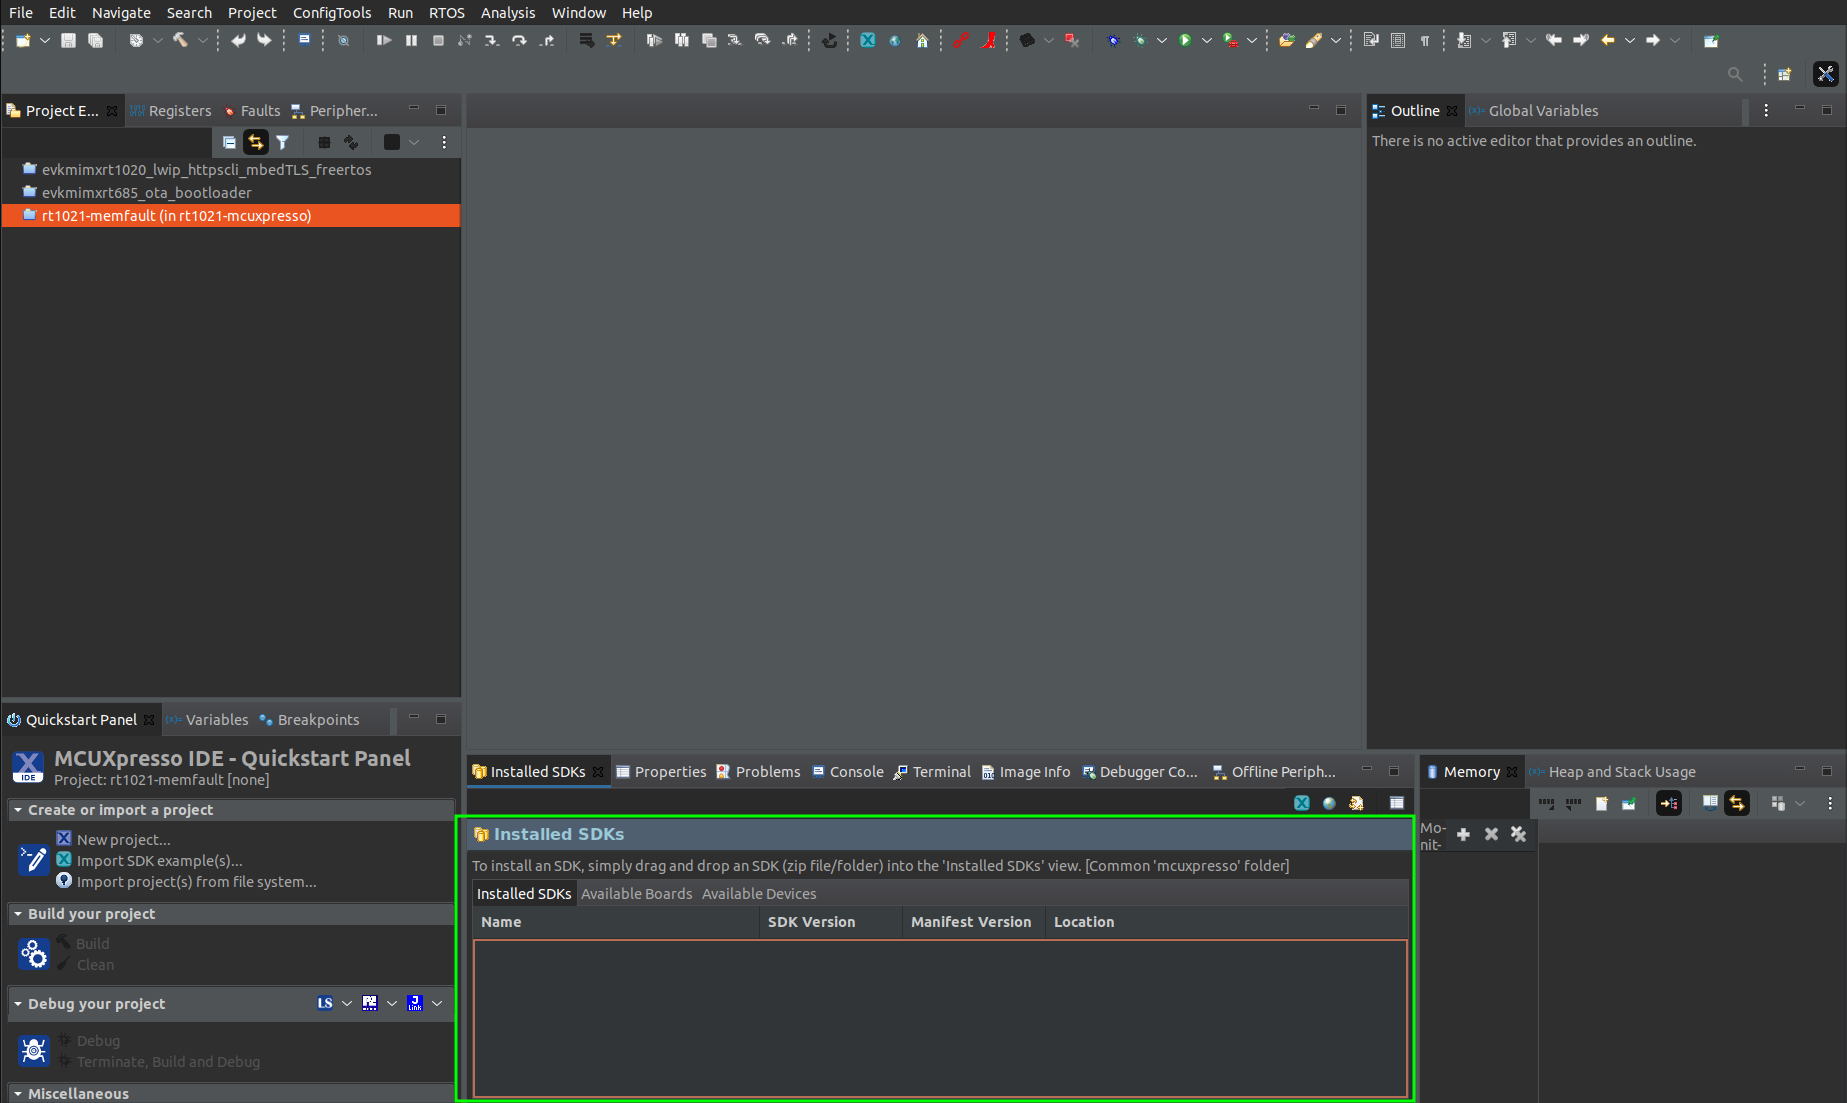
Import the SDK into MCUXpresso:
-
To create the sample project, click "Import SDK example(s)...", then select our board, and select
lwip_httpscli_mbedTLS_freertos: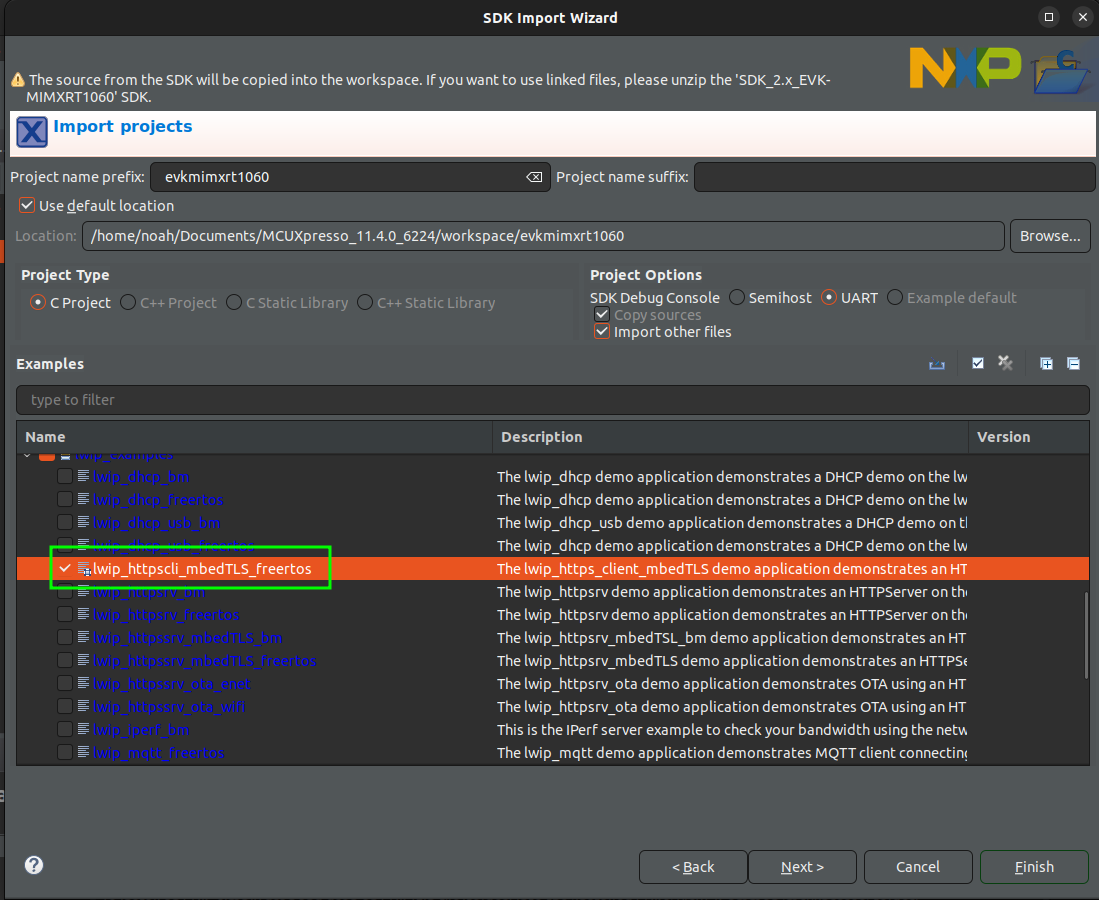
-
Default settings in the next screen are all OK, except for:
- Set library type (and hosting variant): change it to "NewlibNano (none)"
- Include semihost HardFault handler: uncheck
-
Build the sample with "Project→Build all"
-
Flash the sample with "Run→Debug as...→MCUXpresso IDE LinkServer (inc. CMSIS-DAP) probes", assuming the EVK has the default CMSIS-DAP debug firmware
-
Open a serial terminal (example below is using pyserial):
pyserial-miniterm --raw /dev/ttyACM0 115200 -
Pressing "Run" in MCUXpresso, the following output should appear in the serial terminal:
Initializing PHY... -
Connect an ethernet cable to a router to see the demo proceed
Part 2: Integrate the Memfault SDK
👉 This section describes how to add the Memfault SDK sources. In this example, the Memfault Demo CLI is connected to the debug UART in order to test the Memfault functionality, and an HTTPS client is enabled over the Ethernet connection for uploading Memfault data.
Note that the provided HTTPS client example is specific to the i.MX RT1060 EVK sample app; other boards will potentially require a different connectivity implementation.
Add the Memfault Sources and Build Flags
-
Download the Memfault SDK. either copy the folder into the project, or preferably, add it as a Git submodule:
git submodule add https://github.com/memfault/memfault-firmware-sdk.git memfault-firmware-sdk -
Run the eclipse patch script to add the Memfault sources (including the "demo" component, which is the test CLI):
python memfault-firmware-sdk/scripts/eclipse_patch.py --project-dir . --memfault-sdk-dir memfault-firmware-sdk --components core,util,metrics,panics,demo --target-port freertos -
Copy in the platform template files:
cp memfault-firmware-sdk/ports/templates/* source/ -
Refresh the project (right-click on the Project, "Refresh")
-
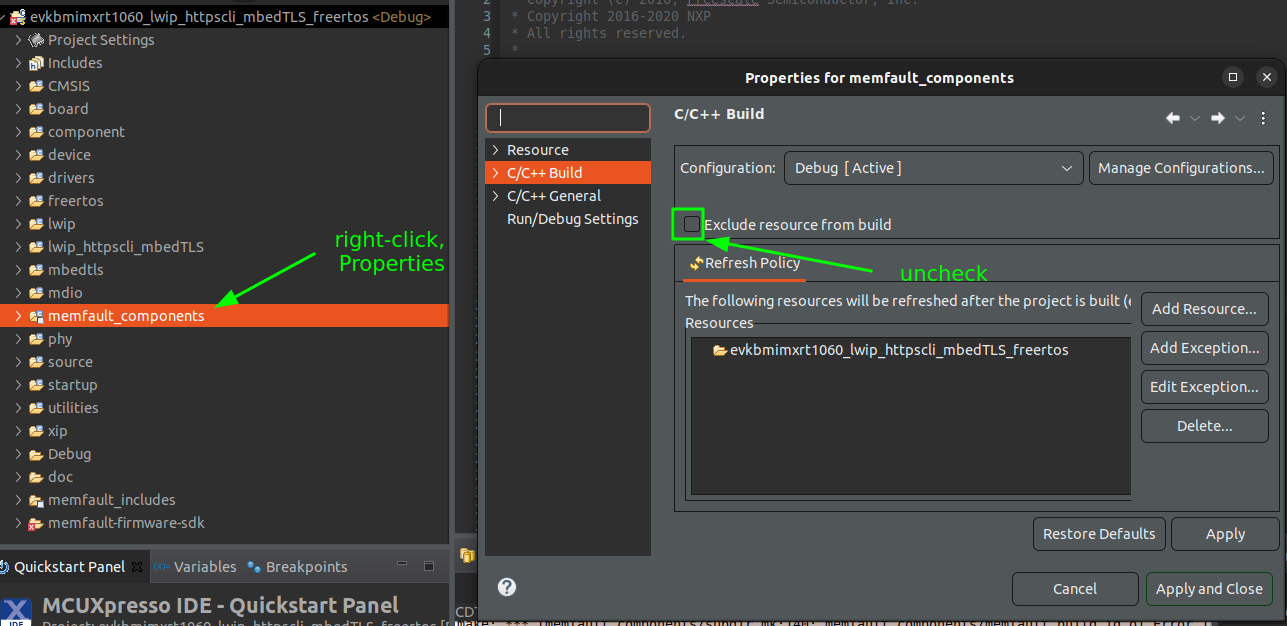
To enable the Memfault SDK sources in the build, uncheck "Exclude from build" for the "memfault_components" virtual folder:
-
Add the
memfault_platform_ram_backed_coredump.csource file to a new virtual folder-
Create a new virtual folder. this is to not conflict with the sources the
eclipse_patch.pyscript operates on, so that script can be re-run in the future (eg if the Memfault SDK is updated) without affecting these port-specific sources, so name itmfltport_components -
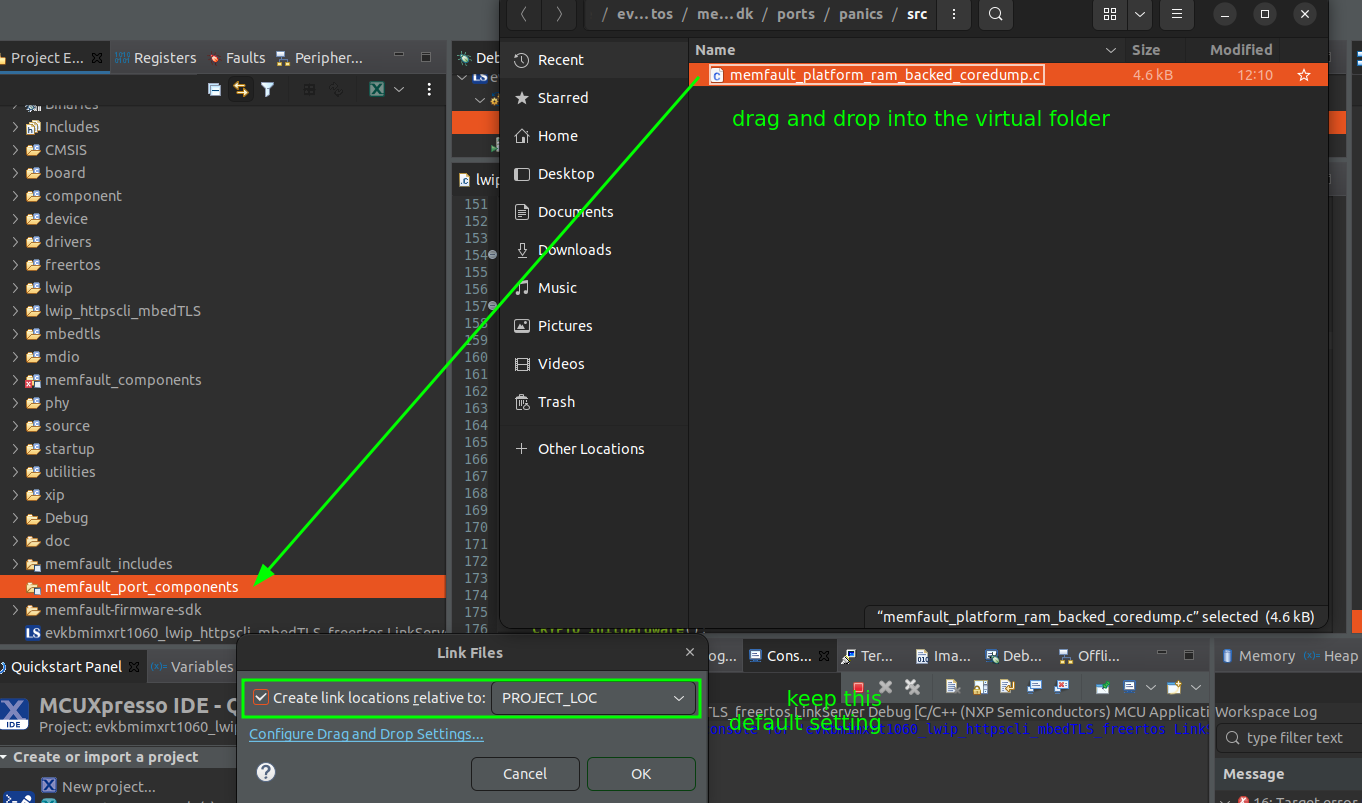
Add the source file, which is located at
memfault-firmware-sdk/ports/panics/src/memfault_platform_ram_backed_coredump.c, by dragging from a file explorer window into the virtual folder: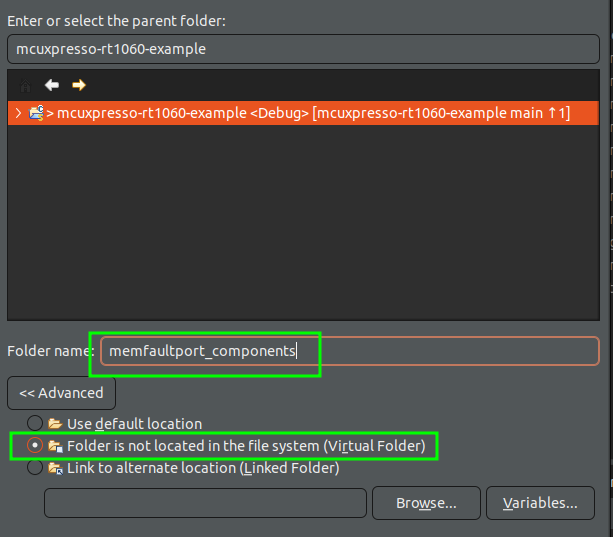
-
Right-click on the new virtual folder, select "Properties", and uncheck "Exclude from build"
-
-
Add the following stubs to
source/memfault_platform_port.c:#include <stdio.h>#include "fsl_debug_console.h"void memfault_platform_log(eMemfaultPlatformLogLevel level, const char *fmt,...) {const char *lvl_str;switch (level) {case kMemfaultPlatformLogLevel_Debug:lvl_str = "D";break;case kMemfaultPlatformLogLevel_Info:lvl_str = "I";break;case kMemfaultPlatformLogLevel_Warning:lvl_str = "W";break;case kMemfaultPlatformLogLevel_Error:lvl_str = "E";break;default:return;break;}va_list args;va_start(args, fmt);char log_buf[128];vsnprintf(log_buf, sizeof(log_buf), fmt, args);PRINTF("[%s] MFLT: %s\n", lvl_str, log_buf);va_end(args);}bool memfault_platform_metrics_timer_boot(uint32_t period_sec, MemfaultPlatformTimerCallback callback) {(void)period_sec, (void)callback;// Schedule a timer to invoke callback() repeatedly after period_secreturn true;}uint64_t memfault_platform_get_time_since_boot_ms(void) {// Return time since boot in ms, this is used for relative timings.return 0;}MEMFAULT_PUT_IN_SECTION(".noinit.mflt_reboot_tracking")static uint8_t s_reboot_tracking[MEMFAULT_REBOOT_TRACKING_REGION_SIZE];MEMFAULT_WEAK void memfault_platform_reboot_tracking_boot(void) {sResetBootupInfo reset_info = {0};memfault_reboot_reason_get(&reset_info);memfault_reboot_tracking_boot(s_reboot_tracking, &reset_info);}void memfault_reboot_reason_get(sResetBootupInfo *info) {const uint32_t reset_cause = 0; // TODO: Populate with MCU reset reasoneMemfaultRebootReason reset_reason = kMfltRebootReason_Unknown;// TODO: Convert MCU specific reboot reason to memfault enum*info = (sResetBootupInfo){.reset_reason_reg = reset_cause,.reset_reason = reset_reason,};} -
Add
memfault_platform_boot();tomain()(located insource/lwip_httpscli_mbedTLS_freertos.c. -
Confirm the project now builds.
Add GNU Build ID
-
Add GNU build id:
-
Add this flag to
source/memfault_platform_config.h:#define MEMFAULT_USE_GNU_BUILD_ID 1 -
Add the following file at
source/gnu_build_id.ld:/*Custom section to be included in the linkercommand file, to support GNU build id.*/SECTIONS{.note.gnu.build-id :{__start_gnu_build_id_start = .;KEEP(*(.note.gnu.build-id))}}INSERT AFTER .text; -
Add the necessary linker flags: right-click project→Properties. in the left pane, open "C/C++ Build"→"Settings", then select MCU Linker→Miscellaneous, and add the
--build-idbuild flag: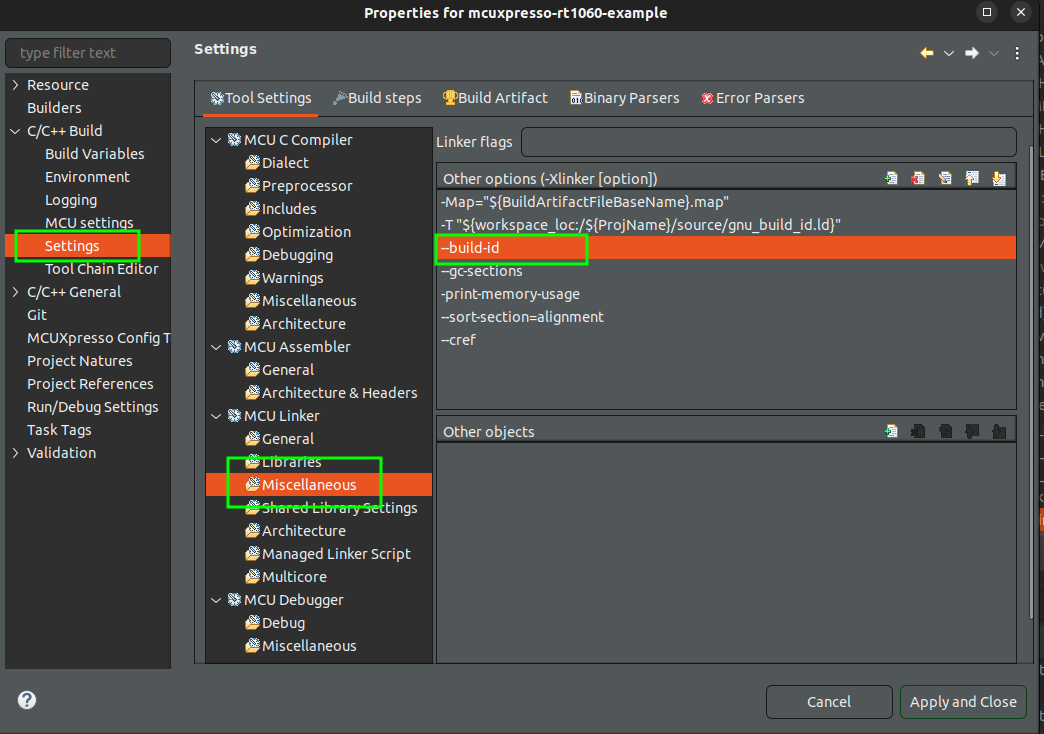
-
Add a second flag to add the linker script fragment file to the build:
-T "${workspace_loc:/${ProjName}/source/gnu_build_id.ld}"
-
-
Set Debug Level to
-g3in "MCU C Compiler"→Settings: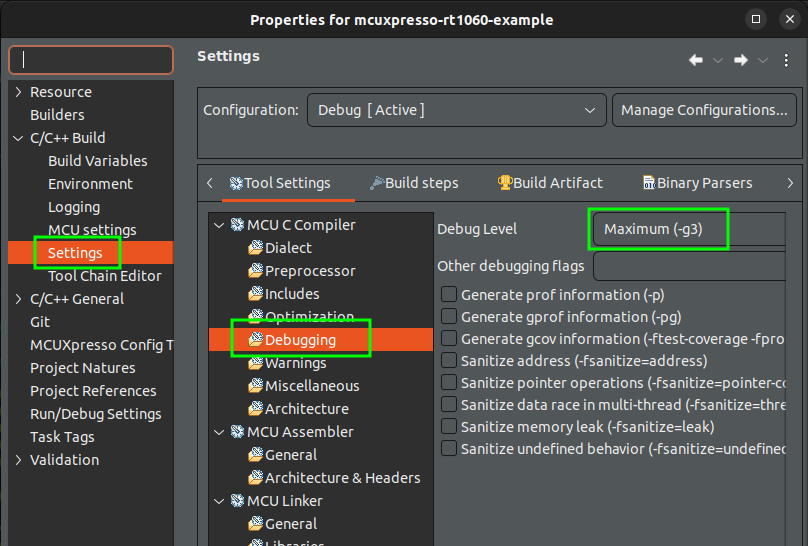
-
Clean and build. flash the project to the board and confirm the startup text appears in the serial console:
[I] MFLT: GNU Build ID: 63a58c3567c22fd6786adbc4cc186d258e66efe7[I] MFLT: S/N: DEMOSERIAL[I] MFLT: SW type: app-fw[I] MFLT: SW version: 1.0.0[I] MFLT: HW version: dvt1[I] MFLT: Memfault Initialized!
Enable HTTPS Client and Test
-
The last step is to pick up the necessary port + https client changes, which can be found under the
source/directory in this repo: https://github.com/memfault/mcuxpresso-rt1060-example-
Copy the necessary files:
- Everything under
source/ lwip_httpscli_mbedTLS/httpsclient.c
- Everything under
-
Configure a Memfault Project Key by replacing the placeholder text in
lwip_httpscli_mbedTLS/httpsclient.c. The Project Key is located under Settings in the Memfault project, see Exporting Chunks Over Console// Memfault Project Keyconst char *memfault_project_key = "<YOUR PROJECT KEY HERE>"; -
Flashing this should show a new
post_chunksconsole command when runninghelp:[I] MFLT: GNU Build ID: 63a58c3567c22fd6786adbc4cc186d258e66efe7[I] MFLT: S/N: DEMOSERIAL[I] MFLT: SW type: app-fw[I] MFLT: SW version: 1.0.0[I] MFLT: HW version: dvt1[I] MFLT: Memfault Initialized!mflt> helpget_core: Get coredump infoclear_core: Clear an existing coredumpcrash: Trigger a crashtrigger_logs: Trigger capture of current log buffer contentsdrain_chunks: Flushes queued Memfault data. To upload data see https://mflt.io/posting-chunks-with-gdbtrace: Capture an example Trace Eventget_device_info: Get device inforeboot: Reboot system and tracks it with a Trace Eventexport: Export base64-encoded chunks. To upload data see https://mflt.io/chunk-data-exportpost_chunks: Upload chunks to Memfaulthelp: Lists all commands
-
-
Test out the demo commands, eg
crash,reboot,post_chunks. Thepost_chunkscommand requires an ethernet cable to be connected, with network access to the internet.noteNote: be sure to detach the debugger before running the
crashorrebootcommands. Depending on configuration, the debugger may prevent the board from resetting correctly!
Troubleshooting Data Transfer
If you encounter any issues in your data transfer implementation, Memfault has tools to help debug.
- To troubleshoot data not getting uploaded or processed correctly by Memfault, take a look at the Integration Hub → Processing Log view. This provides a filterable, chronological view of recent errors that have occurred while processing received data. For more information, see the Integration Hub documentation.
- A view to inspect the raw chunk data payloads that have arrived for your project.
- Precanned Data Payloads you can pass through your `user_transport_send_chunk_data()` implementation to test data transfer in isolation.
- Server-side rate limiting will apply to the device you're using to work on the integration process. Once you can see the device on the Memfault web app, consider enabling Server-Side Developer Mode for that device to temporarily bypass these limits.
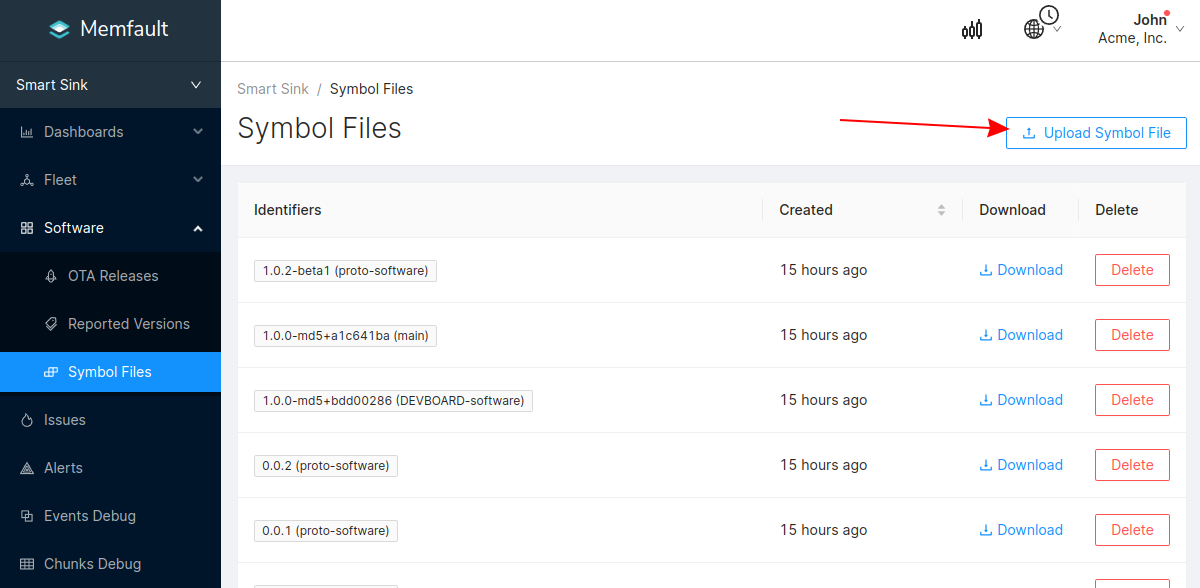
Upload Symbol File
To see decoded data on app.memfault.com, the Symbol File will need to be
uploaded. typically the symbol file will be a .axf file named from the
project, for example Debug/mcuxpresso-rt1060-example.axf.
Symbol files can be uploaded from the Software → Symbol Files tab (follow to be brought to the symbol file upload point in the UI):
Additional Notes
Data Cache
The i.MX RT10xx series uses a Cortex-M7 core with an instruction and data cache. See the FAQ entry on D-cache flushing for details on why this matters and how to handle it.
Some ARM Cortex-M processors include a data cache (D-cache), notably the
Cortex-M7 and Cortex-M33 cores (e.g. NXP i.MX RT, STM32H7, STM32U5, and
other high-performance Cortex-M SoCs). The Memfault SDK relies on a minimum of 1
variable stored in non-initialized (.noinit) RAM when the system encounters a
crash. If the RAM-backed coredump storage component is used, that data is also
stored in a non-initialized section of RAM.
Because the D-cache may hold dirty cache lines that have not yet been written back to RAM, it's important to flush the D-cache before issuing a reset. Otherwise, the cached reboot-reason or coredump data may be lost. The CMSIS API to perform that flush is:
SCB_CleanDCache();
This call should be inserted before the chip is reset, typically in
memfault_platform_reboot() just before NVIC_SystemReset():
void memfault_platform_reboot(void) {
  // flush the data cache before issuing the reboot, to ensure the saved reboot
  // reason data or RAM-backed coredump data is written out
  SCB_CleanInvalidateDCache();
  // ensure all memory accesses have completed before issuing the reset
  __DSB();
  __ISB();

  NVIC_SystemReset();
  while (1) { } // unreachable
}
For reference, see this white paper from Microchip on managing cache coherency in Cortex-M7 based MCUs:
And the CMSIS D-cache API documentation:
https://www.keil.com/pack/doc/CMSIS/Core/html/group__Dcache__functions__m7.html