Nordic nRF Connect SDK Integration Guide
In this guide we will walk through the steps for integrating the Memfault Firmware SDK into a project using Nordic Semiconductor's nRF Connect SDK (NCS).
Memfault supports the below versions of nRF-Connect SDK. If a version is not included below, please contact us and we'll let you know the status!
- ✅ >= v1.9.2, <= v3.0.0 tested and supported
This integration is written for the nrf9160-DK, but is similar when targeting other boards with the nRF Connect SDK.
nRF Connect SDK has built-in support for the Memfault Firmware SDK on nRF9160-based targets. Nordic Semiconductor provides some excellent documentation on how to integrate Memfault in your existing nRF Connect SDK project, together with a sample integration project (source available here). We recommend following both this documentation page as well as Nordic's.
Upon completion of the integration, the following subcomponents will be added to your system!

Supported NCS Versions
Memfault targets supporting new NCS releases as they arrive. If a version is not included below, please contact us and we'll let you know the status!
- ✅ >= v1.9.2, <= v2.8.0 tested and supported
1. Create a Project
Create a Project and get a Project Key
Go to app.memfault.com and from the "Select A Project" dropdown, click on "Create Project" to setup your first project. Choose a name that reflects your product, such as "smart-sink-dev".
Once you've created your project, you'll be automatically taken to an page that includes your project key. Copy the key and follow the rest of this guide.
2. Set up the SDK
This tutorial assumes you have a working nRF Connect SDK Environment with nRF Connect SDK version >=1.9.2 and are able to flash a board supported by the SDK (i.e nRF91, nRF52, nRF53, nRF54, etc).
Due to changes in behavior of the OTA server and checking of multiple certificates in NCS version v2.4.0, Memfault SDK versions < v1.5.0 are incompatible with NCS versions >= v2.4.0. Therefore, any projects with older versions of NCS and Memfault < v1.5.0 should first upgrade Memfault before upgrading NCS. Please contact us immediately if you encounter any cert-related issues.
Include memfault-firmware-sdk in your west.yml
The nRF Connect SDK embeds the Memfault SDK as a module:
loading...
To update the Memfault SDK without updating the nRF Connect SDK, you can add the
Memfault SDK as a module in your application's west.yml:
        manifest:
          remotes:
            - name: nrf-connect-sdk
              url-base: https://github.com/nrfconnect
            # Add the Memfault GitHub repo
            - name: memfault
              url-base: https://github.com/memfault

          projects:
            - name: sdk-nrf
              remote: nrf-connect-sdk
              path: nrf
              revision: 2.3.0
              import: true

            # Explicitly add the Memfault SDK, to override the version in the sdk-nrf manifest
            - name: memfault-firmware-sdk
              path: modules/lib/memfault-firmware-sdk
              revision: 0.43.3
              remote: memfault
          self:
            path: my_example_application
Zephyr's west tool will use the explicitly listed version of the
memfault-firmware-sdk module instead of the one specified by the
nrf-connect-sdk module. Reference:
After updating the West Manifest, run 👉west update👈 to pull in the Memfault
SDK. Double check that you see the SDK source folder memfault-firmware-sdk
under modules/lib/. You can manually check the version of the SDK with the
following command (run from the West workspace root):
# open the Memfault Firmware SDK commit in the default web browser:
❯ open https://github.com/memfault/memfault-firmware-sdk/commit/$(git -C modules/lib/memfault-firmware-sdk rev-parse HEAD)
Update Kconfig options
Add or update the appropriate options in your system's prj.conf
(Memfault project key here):
# Project-specific configuration settings

CONFIG_MEMFAULT=y
CONFIG_MEMFAULT_NCS_PROJECT_KEY="YOUR_PROJECT_KEY"
You can find more details on the available options using menuconfig,
guiconfig, and in the Kconfig sources in
modules/memfault-firmware-sdk/ports/zephyr/Kconfig.
CONFIG_MEMFAULT_NCS_PROJECT_KEY is optional in nRF Connect SDK >=v3.0.0 for
any device that does not use MDS or the Memfault HTTP client to upload chunks to
the Memfault cloud, and instead relies on an upstream device to forward data.
3. "Hello Memfault"
Next, we'll add the remaining changes needed to produce some Memfault data, such as a Reboot Event or Coredump.
Add Application Config Files
Besides Kconfigs, the Memfault SDK is configured through definitions in 3 files. To start, create empty versions of these files:
cd $APPLICATION_DIR
mkdir -p config
touch config/memfault_platform_config.h
touch config/memfault_metrics_heartbeat_config.def
touch config/memfault_trace_reason_user_config.def
We will use these files in the following sections to define metrics and set
other SDK options. To set up some include path dependencies between your
application, NCS/Zephyr, and the Memfault SDK, add this line to your application
CMakeLists.txt:
zephyr_include_directories(config)
See the nRF Connect Docs for more information.
Implement Platform Dependencies
The first dependency to complete is our memfault_platform_get_device_info()
implementation. There are a few options available:
MEMFAULT_DEVICE_INFO_BUILTIN: provides a built-in implementation using either dynamic or static valuesMEMFAULT_DEVICE_INFO_CUSTOM: allows for a more custom implementation, entirely defined by your application
For most setups, we recommend MEMFAULT_DEVICE_INFO_BUILTIN.
- nRF9160
- nRF52 & nRF53 & nRF54
For nRF9160 devices, no additional changes are needed as NCS takes care of many defaults.
For nRF52/53/54 devices, we will need to set additional Kconfigs:
MEMFAULT_NCS_DEVICE_ID_STATIC: Sets the device ID to the value of the KconfigMEMFAULT_NCS_DEVICE_ID.MEMFAULT_NCS_DEVICE_ID: Value used with static device ID configuration. This field sets the device serial used by Memfault.MEMFAULT_NCS_FW_TYPE: Value used with built-in device info implementation. This field sets the Software Type used by Memfault.
Implement a custom memfault_platform_get_device_info() if the device info
fields cannot be set into the static Kconfig values (i.e. in prj.conf or the
command line). Set CONFIG_MEMFAULT_DEVICE_INFO_CUSTOM=y in prj.conf, and
implement memfault_platform_get_device_info() in your application.
A stub memfault_platform_get_device_info() function looks like this, for
reference:
#include "memfault/core/platform/device_info.h"

void memfault_platform_get_device_info(sMemfaultDeviceInfo *info) {
  // *NOTE* All fields must be populated, and the values assigned to the fields
  // must have static lifetime: the data is accessed when this function returns.
  *info = (sMemfaultDeviceInfo) {
    // Set the device serial to a unique value
    // This is used to deduplicate devices in the Memfault cloud
    // and is typically set to a unique identifier like a serial number
    // or MAC address
    .device_serial = "DEMOSERIAL123",
    // Set the device software type
    // This is used to filter devices in the Memfault UI
    .software_type = "nRF9160",
    // Set the device software version
    // This is used to filter devices in the Memfault UI
    .software_version = "1.0.0",
  };
}
With this complete, our application should build!
Using the Memfault Shell
By default, the Memfault Firmware SDK provides a set of shell commands to test and exercise different Memfault functions. Some features of the shell include commands to:
- Trigger asserts and other faults
- Reboot the device
- Export Memfault data over the shell via base64 encoding
To confirm our integration, let's start with generating a reboot event to verify the reboot tracking component is working.
- nRF9160
- nRF52 & nRF53 & nRF54
- Trigger a device reboot with
mflt test reboot - Wait for the device to reboot, reconnect, and automatically post any Memfault data using the nRF9160 LTE modem
- Trigger a device reboot with
mflt test reboot - When the device reboots, run
mflt export
The mflt export command will output a base64 encoded chunk containing a reboot
event triggered from the prior command.
*** Booting Zephyr OS build v3.3.99-ncs1-1 ***
Starting Bluetooth Memfault example
Bluetooth initialized
Advertising successfully started
uart:~$ mflt export
MC:CAKnAgIDAQpqbnJmLWJsZS1mdwlsMC4wLjErYjJhNGZmBnNucmY1MjgzM2RrX25yZjUyODMzC0aypP9L3zEEowECBAQFAL0a:
Copy the logs from the console, navigate to the "Integration Hub / Chunks Debug" view for your project, and paste the logs:
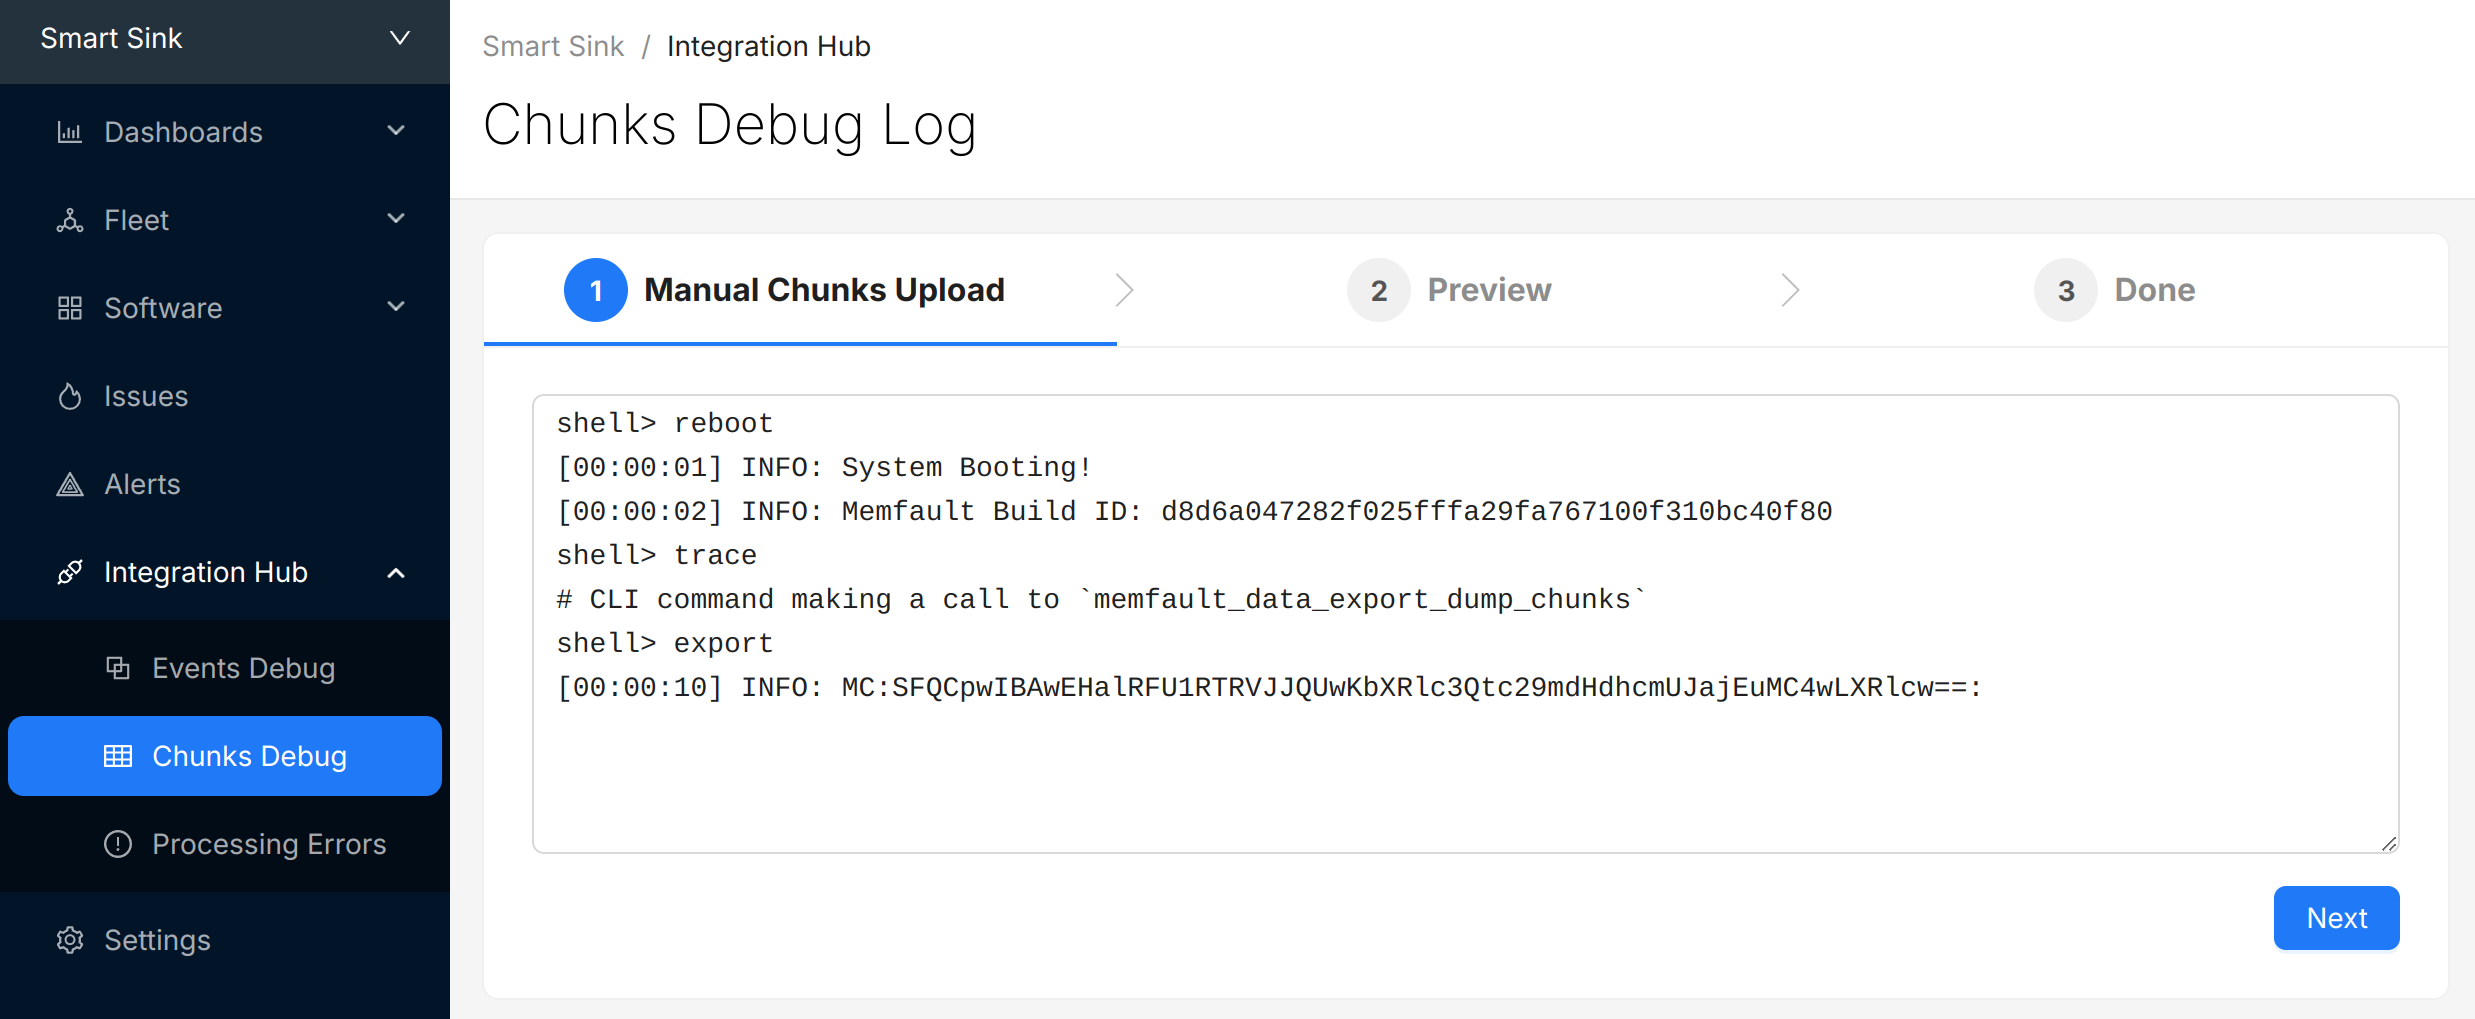
Select "Next" to review the chunks that were identified and (optionally) update the "Device Serial" being used to report data:
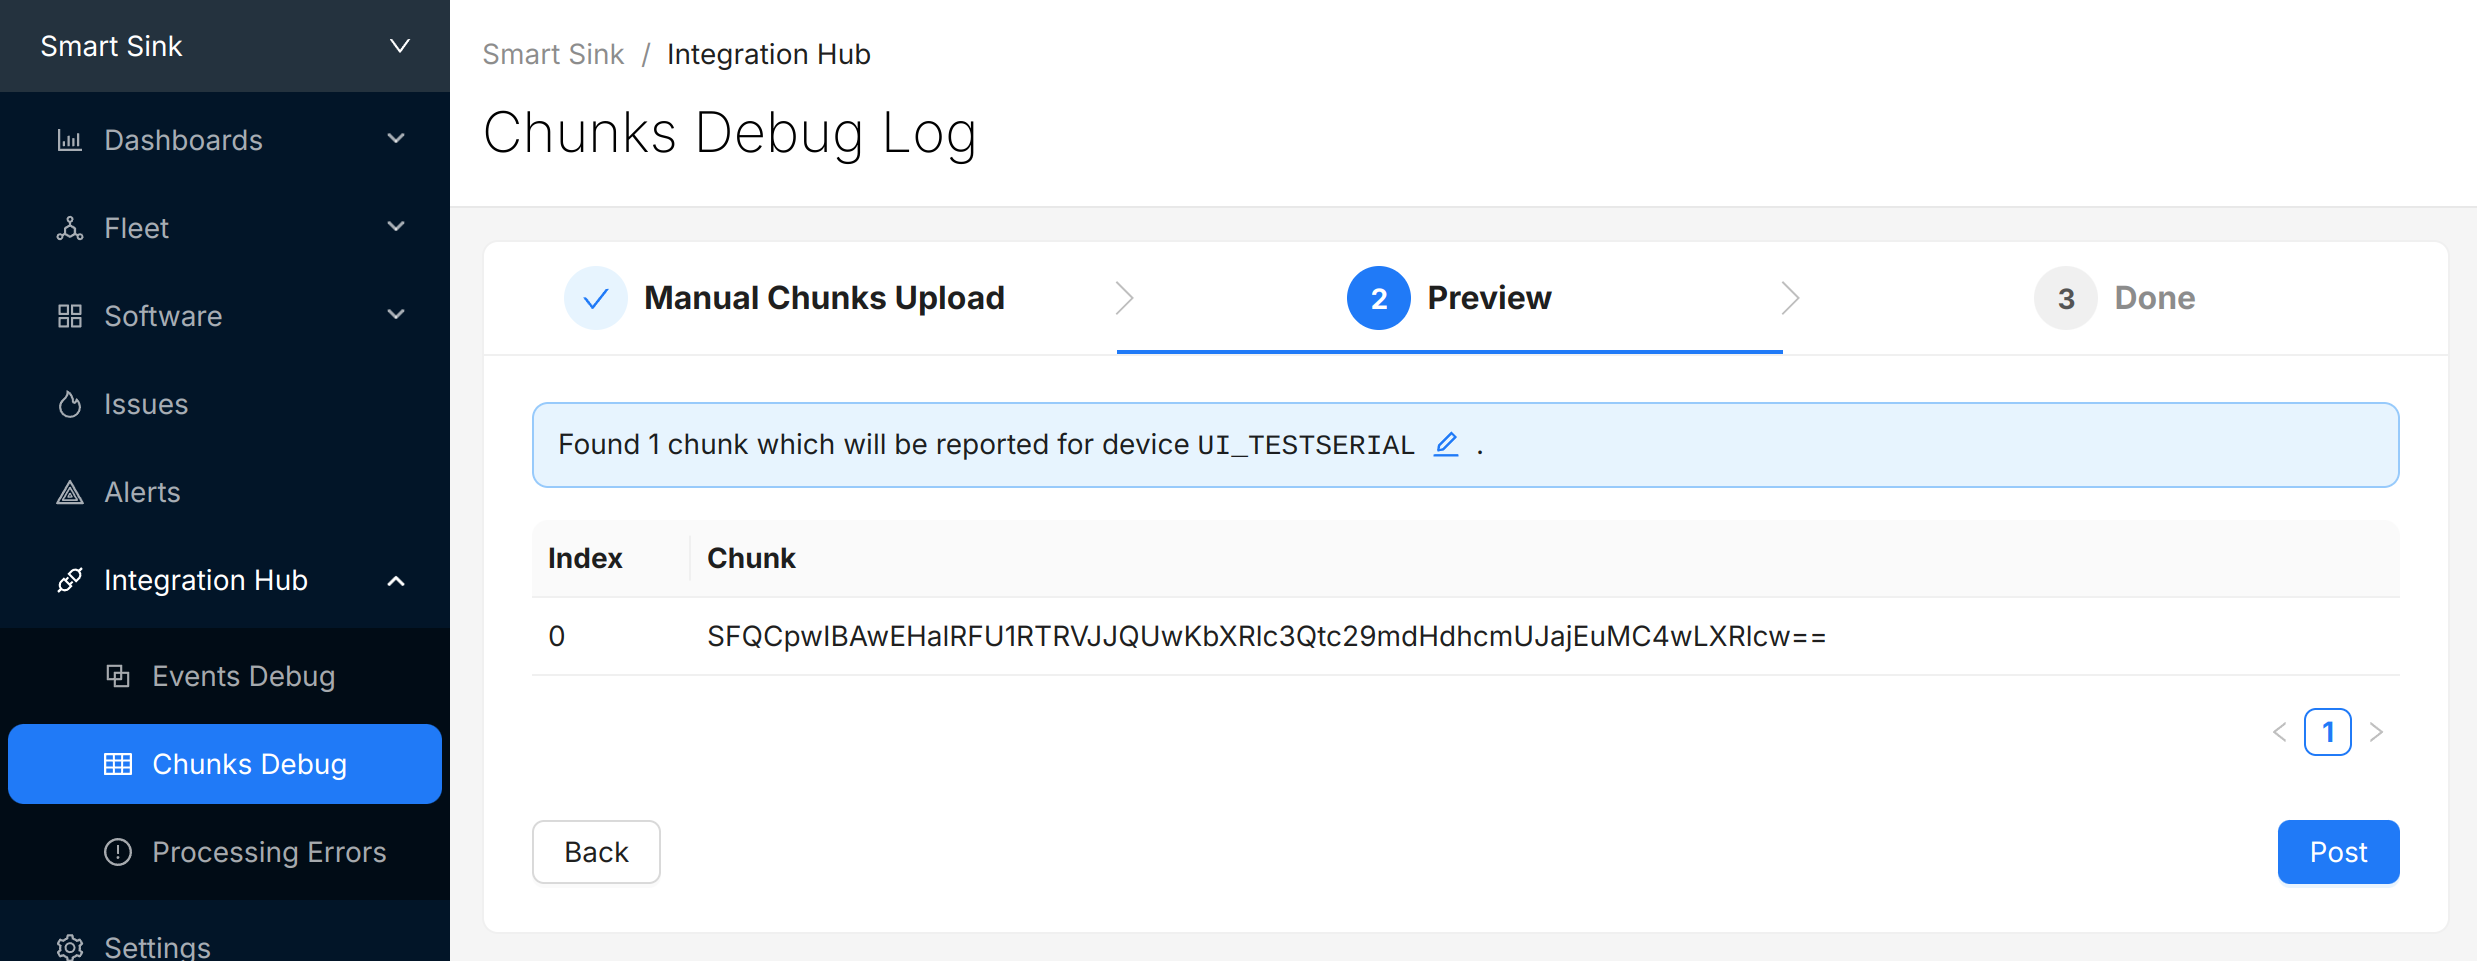
Select "Post" to submit the chunks to Memfault. The chunks will appear directly below in the view. Check and make sure there are no "Errors" to address.

Tip: Chunks can be manually copied into the Integration Hub → Chunks Debug page or automatically via the Memfault CLI. See the console or post-chunks commands for details.
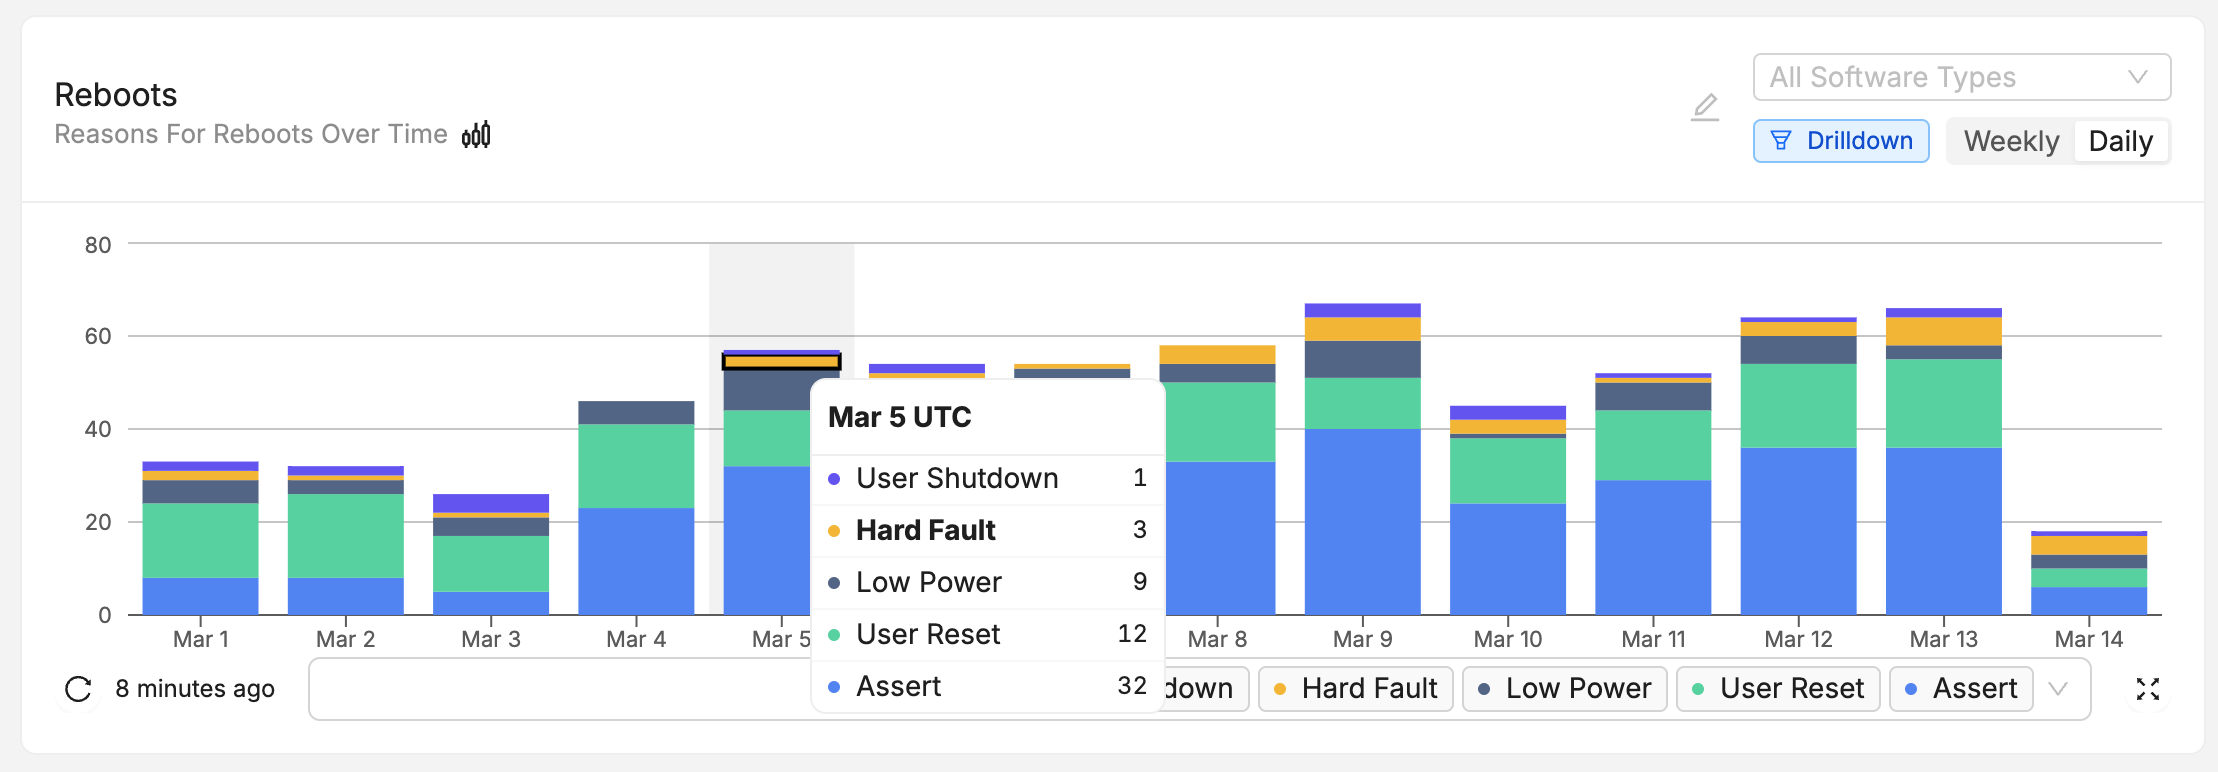
With this chunk uploaded to Memfault, we can verify the event sent to Memfault by navigating to Fleet → Devices → <YOUR_DEVICE> and observing a new entry in the Reboots swimlane.
4. Manually Capture a Coredump
Next, we'll use the built-in commands to capture a coredump
- Trigger a software assert with
mflt test assert - Export the data using the previous method, such as over LTE or importing the exported chunks in the Chunks Debug page
After uploading the coredump data, Memfault will need your symbol file to process the sent data.
Upload a Symbol File
The remaining step is to upload your symbol file to allow Memfault to process
the received coredump data. Your symbol file is located within your build
folder. The default location is <workspace_root>/build/zephyr/zephyr.elf.
Symbol files can be uploaded from the Software → Symbol Files page.
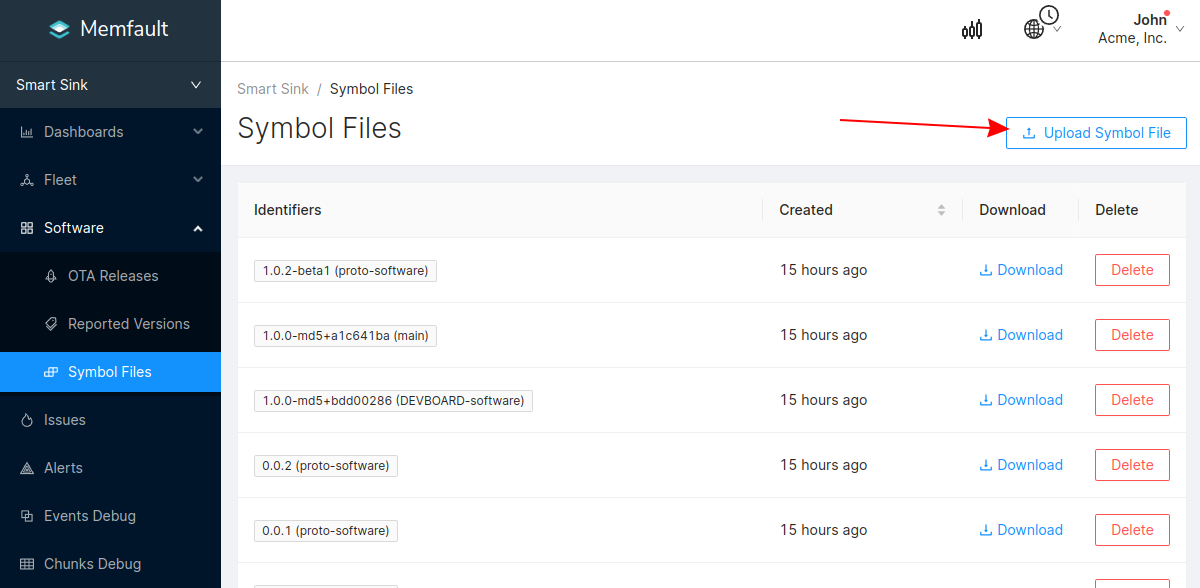
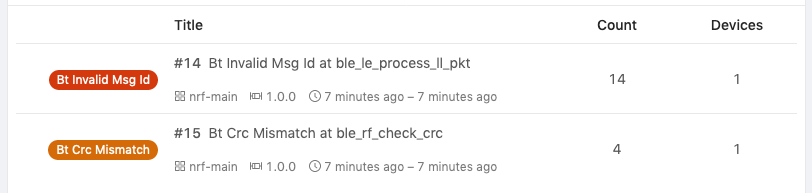
After this step, you will see the trace in the list of issues!
You can programmatically upload symbol files with the Memfault CLI tool.
5. Manually Capture Logs
The Memfault SDK will (sparingly) emit diagnostic logs to alert of integration configuration problems. The logging subsystem can also easily serve as logging infrastructure for your platform if you still need to set up one.
Memfault Logging Kconfigs
The Memfault logging component integrates as a Zephyr logging backend and is
controlled via Kconfig. Add the following to your prj.conf:
CONFIG_MEMFAULT_LOGGING_ENABLE. This will enable the Memfault logging backend
to collect logs sent with Zephyr's LOG_X() and MEMFAULT_LOG_X.
Collecting Logs
Calls to the Zephyr or Memfault logging macros will automatically collect logs. The CLI provides a few commands to test this:
- Force some calls to the logging macros:
mflt test logs - Trigger a log collection:
mflt test log_capture
After executing these commands, the SDK will now contain a serialized capture of these logs. Use the previous export method to send the chunks to Memfault.
6. Configuring Standard Metrics
The Metrics component is a simple and easy way to measure run-time performance and behavior of your device.
Memfault Metrics Kconfigs
The Metrics component is configured via Kconfig and enabled by default.
Built-in Metrics for the NCS
- nRF9160
- nRF52 & nRF53 & nRF54
The nRF Connect SDK provides some pre-enabled metrics for the nRF9160:
| Metric | Description |
|---|---|
ncs_lte_time_to_connect_ms | The time it took to connect to the network |
ncs_lte_connection_loss_count | The number of connection lost events |
ncs_lte_psm_tau_seconds | The assigned PSM tracking area update (TAU) |
ncs_lte_psm_active_time_seconds | The active time for PSM |
ncs_lte_edrx_interval_ms | The assigned eDRX interval |
ncs_lte_edrx_ptw_ms | The assigned eDRX paging time window (PTW) |
ncs_lte_mode | LTE mode. 0 = None, 7 = LTE-M, 9 = NB-IoT |
ncs_lte_on_time_ms | The time the modem is on |
ncs_lte_reset_loop_detected_count | The number of times the modem detects a reset loop on the host processor* |
ncs_lte_modem_fw_version | The version of the modem firmware, e.g. nrf9160_1.3.5 |
ncs_lte_operator | The network operator proving service, e.g. AT&T (US), EE (UK) |
ncs_lte_snr_decibels | The signal to noise ratio, an indicator of the signal quality |
ncs_lte_rsrp_dbm | The reference signal received power, an indicator of signal quality |
ncs_lte_tx_kilobytes | The number of kilobytes transmitted via the modem |
ncs_lte_rx_kilobytes | The number of kilobytes received via the modem |
ncs_lte_band | The assigned frequency band (enumeration)** |
*If the modem detects a reset loop in the main processor, it will prevent network attaches for 30 minutes. This count will indicate how many times this event occurs, and indicate to developers why their LTE modem was offline
**The band enumerations map to a 3GPP frequency band, which are defined in 3GPP Tech Spec 36.101, and are widely referenced across the web (here, for example).
These metrics are enabled with the Kconfig
CONFIG_MEMFAULT_NCS_LTE_METRICS=y.
Additionally, there is built-in metric, ncs_connection_poll_unused_stack, for
the LTE connection poll thread stack. This metric is enabled with the Kconfig
CONFIG_MEMFAULT_NCS_STACK_METRICS=y.
When setting up a Project in the Memfault app, selecting the nRF91 MCU will
pre-populate a few fleet metrics charts
visualizing the pre-enabled metrics:

See the list in this file in the NCS repo:
The nRF Connect SDK optionally provides some pre-enabled metrics for the nRF52/nRF53/nRF54 series:
ncs_bt_connection_time_msncs_bt_connection_countncs_bt_bond_count
These metrics are enabled with the Kconfig
CONFIG_MEMFAULT_NCS_BT_METRICS=y.
Additionally, built-in metrics for bluetooth thread stacks include:
ncs_bt_rx_unused_stackncs_bt_tx_unused_stack
These metrics are enabled with the Kconfig
CONFIG_MEMFAULT_NCS_STACK_METRICS=y.
Defining Metrics
Heartbeat metrics allow you to easily monitor your platform and confirm it is operating as expected.
Typical Heartbeat Examples
- investigate problems that didn't cause a reboot (bad connectivity, network or sensor error rates) and marginality that crops up in a fleet
- providing leading indicators of problems (rapid battery drain, drop in activity, etc)
- compare trends across releases (improved connectivity, data efficiency etc)
Best Practices around each metric type that we recommend:
- Timers - These are used to track time spent in particular states and can be used for debugging connectivity, battery life, and performance issues.
- Counters - Track counts of a particular event class taking place. Suggested
use cases are:
- Operations your system are performing (number of events serviced by a task, bytes sent over network, bytes written to flash). Alerts can be configured to identify devices operating outside normal thresholds.
- Counts of events for events that should never happen (i2c bus write error count, flash write error). You can alert if any of these situations are seen.
- Gauges - These are values sampled at the end of each Heartbeat interval.
Common items include
- Battery Metrics (Drop over an hour, current percent)
- Heap utilization / stack high watermark
Add Metric to memfault_metrics_heartbeat_config.def
//! @file memfault_metrics_heartbeat_config.def
MEMFAULT_METRICS_KEY_DEFINE(MainTaskWakeups, kMemfaultMetricType_Unsigned)
Instrument Code to Update Heartbeat
void my_main_task(void) {
   while (1) {
      your_rtos_wait_for_event();
      MEMFAULT_METRIC_ADD(MainTaskWakeups, 1);
   }
}
7. Automatically Upload Data
Using the Built-in Memfault Data Transport
- nRF9160
- nRF52 & nRF53 & nRF54
- Other
nRF9160 and nRF7002 devices have direct internet access, and can upload Memfault
diagnostic data over HTTPS. To enable automatic data uploads, add the following
to your prj.conf:
CONFIG_MEMFAULT_HTTP_PERIODIC_UPLOAD=y
The shell command mflt post_chunks can be used to manually trigger an upload
over HTTPS.
As of the v2.1.0 release of the nRF-Connect SDK, there is built-in support for the Memfault Diagnostic Service, which is a Bluetooth LE GATT service designed to enable exporting Memfault data in a standardized way.
Nordic has detailed documentation on the Memfault Diagnostic service here:
https://docs.nordicsemi.com/bundle/ncs-2.6.0/page/nrf/libraries/bluetooth_services/services/mds.html
To enable MDS, add CONFIG_BT_MDS=y to your prj.conf file. Nordic provides
mobile apps specifically built to collect Memfault chunks from MDS devices, you
can download them for
iOS and
Android
There is also a sample application, "Bluetooth LE: Peripheral Memfault Diagnostic Service (MDS)", documented here:
https://docs.nordicsemi.com/bundle/ncs-2.6.0/page/nrf/samples/bluetooth/peripheral_mds/README.html
Nordic and Memfault provide the following Bluetooth LE gateways for testing the MDS implementation:
-
the Python MDS Bluetooth LE gateway script, from the nRF-Connect SDK: https://github.com/nrfconnect/sdk-nrf/tree/v2.6.0/scripts/memfault
-
a Web Bluetooth LE browser-based tool, from Memfault: https://mflt.io/mds
-
iOS and Android open-source libraries:
- Android library: https://github.com/NordicSemiconductor/Android-Memfault-Library
- iOS library: https://github.com/NordicSemiconductor/IOS-Memfault-Library
For a quick test, we recommend using the "Bluetooth LE: Peripheral Memfault Diagnostic Service (MDS)" sample application and one of the mobile apps with a compatible mobile device.
Extensive details about how data from the Memfault SDK makes it to the cloud can be found here. In short, the Memfault SDK packetizes data into "chunks" that must be pushed to the Memfault cloud via the chunk REST endpoint.
A typical integration looks like this:
#include "memfault/core/data_packetizer.h"
// [...]

bool try_send_memfault_data(void) {
  // buffer to copy chunk data into
  uint8_t buf[USER_CHUNK_SIZE];
  size_t buf_len = sizeof(buf);

  bool data_available = memfault_packetizer_get_chunk(buf, &buf_len);
  if (!data_available ) {
    return false; // no more data to send
  }

  // send payload collected to chunks endpoint; this could for example send the
  // packet over a GATT characteristic to the peer device
  user_transport_send_chunk_data(buf, buf_len);
  return true;
}

void send_memfault_data(void) {
  // [... user specific logic deciding when & how much data to send
  while (try_send_memfault_data()) { }
}
Sending data to Memfault over UDP
Please refer to our documentation on Memfault and UDP.
Troubleshooting Data Transfer
See the docs on data transfer troubleshooting.
8. Next Steps
Now that the Memfault SDK is integrated on your device, there are many other features and options to explore. Check out these sections of our docs for more information:
Configuring and Invoking an OTA Update
Due to changes in behavior of the OTA server and checking of multiple certificates in NCS version v2.4.0, Memfault SDK versions < v1.5.0 are incompatible with NCS versions >= v2.4.0. Therefore, any projects with older versions of NCS and Memfault < v1.5.0 should first upgrade Memfault before upgrading NCS. Please contact us immediately if you encounter any cert-related issues.
LTE/Internet Connected Devices (nRF9160)
The NRF Connect
sample integration project
does not come with OTA support enabled by default. To enable this support, a few
settings need to be added. Add or update the appropriate options in your
system's prj.conf:
In NCS v3.0.0, the download client library was deprecated in favor of the downloader library. For more information on migrating to the downloader library, see the v3.0.0 migration guide.
- NCS v3.0.0 or later
- NCS <v3.0.0
CONFIG_MEMFAULT_FOTA=y

# Enable testing FOTA via a CLI command
CONFIG_MEMFAULT_FOTA_CLI_CMD=y

# The subsystems we need so OTA payloads can be written to
# flash and updated by MCUBoot
CONFIG_DFU_TARGET=y
CONFIG_DFU_TARGET_MCUBOOT=y
CONFIG_IMG_MANAGER=y
CONFIG_FLASH=y
CONFIG_FLASH_MAP=y
CONFIG_STREAM_FLASH=y
CONFIG_IMG_ERASE_PROGRESSIVELY=y

# For Memfault FOTA, we will use the FOTA_DOWNLOAD API's
# from the nRF Connect SDK which depends on the DOWNLOADER
CONFIG_FOTA_DOWNLOAD=y
CONFIG_DOWNLOADER=y
CONFIG_DOWNLOADER_MAX_FILENAME_SIZE=400
CONFIG_DOWNLOADER_STACK_SIZE=1600

# Enable printing of file download progress to console
CONFIG_FOTA_DOWNLOAD_PROGRESS_EVT=y
CONFIG_MEMFAULT_FOTA=y

# Enable testing FOTA via a CLI command
CONFIG_MEMFAULT_FOTA_CLI_CMD=y

# The subsystems we need so OTA payloads can be written to
# flash and updated by MCUBoot
CONFIG_DFU_TARGET=y
CONFIG_DFU_TARGET_MCUBOOT=y
CONFIG_IMG_MANAGER=y
CONFIG_FLASH=y
CONFIG_FLASH_MAP=y
CONFIG_STREAM_FLASH=y
CONFIG_IMG_ERASE_PROGRESSIVELY=y

# For Memfault FOTA, we will use the FOTA_DOWNLOAD API's
# from the nRF Connect SDK which depends on the DOWNLOAD_CLIENT
CONFIG_FOTA_DOWNLOAD=y
CONFIG_DOWNLOAD_CLIENT=y
CONFIG_DOWNLOAD_CLIENT_STACK_SIZE=1600
CONFIG_DOWNLOAD_CLIENT_MAX_FILENAME_SIZE=400
CONFIG_DOWNLOAD_CLIENT_HTTP_FRAG_SIZE_1024=y

# Enable printing of file download progress to console
CONFIG_FOTA_DOWNLOAD_PROGRESS_EVT=y
See a full example app that enables OTA using MCUBoot here.
Confirm you have already built and uploaded the OTA compatible app_update.bin
to Memfault with the appropriate semantic version set. The device you wish to
update should be running a lower version. See
our guide on managing your first release
for more information on deploying a release in the Memfault platform!
Finally to invoke the OTA process enter the following command:
uart:~$ mflt_nrf fota
<inf> <mflt>: Checking for FOTA
<inf> <mflt>: FOTA Update Available. Starting Download!
<inf> download_client: Setting up TLS credentials, tag 1003
<inf> download_client: Configuring socket timeout (30 s)
...
<inf> <mflt>: FOTA In Progress
<inf> download_client: Downloaded 2048/204467 bytes (1%)
<inf> download_client: Downloaded 4096/204467 bytes (2%)
...
<inf> download_client: Downloaded 204467/204467 bytes (100%)
<inf> download_client: Download complete
<inf> dfu_target_mcuboot: MCUBoot image upgrade scheduled. Reset device to apply
*** Booting Zephyr OS build v2.7.99-ncs1  *** to install update!
I: Starting bootloader
I: Primary image: magic=unset, swap_type=0x1, copy_done=0x3, image_ok=0x3
I: Secondary image: magic=good, swap_type=0x2, copy_done=0x3, image_ok=0x3
The device resets automatically, running your new firmware.
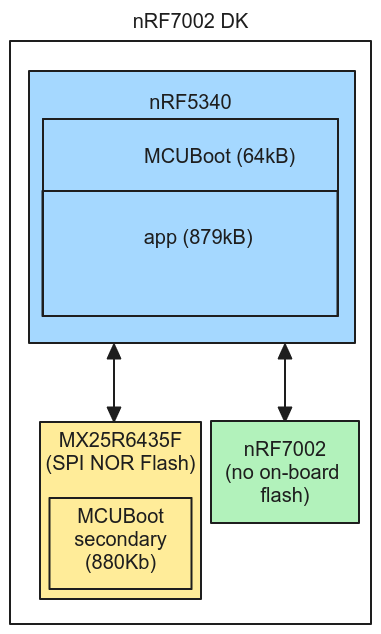
Wi-Fi Connected Devices (nRF7002)
Devices using the nRF7002 Wi-Fi module can use the same Memfault OTA configuration settings as the nRF9160. Be aware that when using the nRF7002 with an nRF5340 host processor (as on the nRF7002 DK), the secondary partition used to stage the OTA payload for MCUBoot needs to be placed on external flash, since the nRF5340 does not have enough internal flash to hold both the secondary and primary partitions (see reference here).
See here for an example project demonstrating Memfault OTA on the nRF7002:
https://github.com/memfault/nrf7002-memfault-example
BLE Connected Devices (nRF52/nRF53/nRF54)
For Nordic devices, FOTA can be performed using the normal Nordic-provided DFU tools, sample apps, and libraries.
Follow the below links for details on how to set that up:
-
nRF52 Device Guide on FOTA Updates
Note: the above guide is for the nRF52, but the same principles apply to the nRF53 and nRF54.
The only Memfault-specific piece of that FOTA process is the fetching of the OTA binary payload, which is performed via an HTTP request against Memfault's server, passing the Memfault Project Key and the Device Serial for the target device:
Below is a brief diagram showing how an nRF52, mobile phone, and Memfault's server interact during an OTA update:
The mobile client libraries for iOS and Android are available on GitHub:
Reboot Reasons for HardFaults
For Nordic devices,
the issue of obtaining reboot reasons when using TF-M
is resolved in nRF Connect SDK v2.8.0. When a fault occurs from non-secure code,
Zephyr fault handlers will be called and in turn, the Memfault fault handlers.
This feature is enabled by default with the Kconfig flag
CONFIG_TFM_ALLOW_NON_SECURE_FAULT_HANDLING=y.
Useful links
Example projects are provided both by Memfault and Nordic:
-
Nordic maintained Asset Tracker v2 Application for nRF9160
- see the documentation for how to build with Memfault enabled
Nordic Memfault Documentation:
Frequently Asked Questions (FAQ)
Updating the Memfault SDK
The nRF Connect SDK embeds the Memfault SDK as a module:
loading...
To update the Memfault SDK without updating the nRF Connect SDK, you can add the
Memfault SDK as a module in your application's west.yml:
        manifest:
          remotes:
            - name: nrf-connect-sdk
              url-base: https://github.com/nrfconnect
            # Add the Memfault GitHub repo
            - name: memfault
              url-base: https://github.com/memfault

          projects:
            - name: sdk-nrf
              remote: nrf-connect-sdk
              path: nrf
              revision: 2.3.0
              import: true

            # Explicitly add the Memfault SDK, to override the version in the sdk-nrf manifest
            - name: memfault-firmware-sdk
              path: modules/lib/memfault-firmware-sdk
              revision: 0.43.3
              remote: memfault
          self:
            path: my_example_application
Zephyr's west tool will use the explicitly listed version of the
memfault-firmware-sdk module instead of the one specified by the
nrf-connect-sdk module. Reference:
After updating the West Manifest, run 👉west update👈 to pull in the Memfault
SDK. Double check that you see the SDK source folder memfault-firmware-sdk
under modules/lib/. You can manually check the version of the SDK with the
following command (run from the West workspace root):
# open the Memfault Firmware SDK commit in the default web browser:
❯ open https://github.com/memfault/memfault-firmware-sdk/commit/$(git -C modules/lib/memfault-firmware-sdk rev-parse HEAD)
What is the advantage of using the Nordic Connect SDK (NCS) instead of stock Zephyr?
While Zephyr is a powerful RTOS and is used at the base operating system with the Nordic Connect SDK, using the NCS directly offers several advantages for developers targeting Nordic MCUs:
-
Optimized Memfault Integration: Nordic and Memfault collaborate closely to ensure seamless integration between NCS and Memfault. This collaboration helps ensure that the latest Memfault compatibility features are promptly incorporated into the NCS releases.
-
Simplified Memfault Implementation: The NCS provides built-in support for Memfault, making integration straightforward and requiring minimal development effort. This allows developers to quickly leverage Memfault's debugging and remote monitoring capabilities within their nRF MCU projects.
-
Hardware Compatibility: Nordic rigorously tests and validates the NCS for compatibility with their hardware platforms. This reduces the risk of encountering unforeseen hardware-specific issues when developing for nRF MCUs.
-
Up-to-date Zephyr Base: Nordic maintains the NCS by regularly incorporating updates from the mainline Zephyr project. This ensures developers benefit from the latest Zephyr features and bug fixes when using the NCS. Typically, the NCS releases occur 2-4 times per year.
Is a Project Key required for devices that have their chunks uploaded by an upstream device?
CONFIG_MEMFAULT_NCS_PROJECT_KEY is optional in nRF Connect SDK >=v3.0.0 for
any device that does not use MDS or the Memfault HTTP client to upload chunks to
the Memfault cloud, and instead relies on an upstream device to forward data.
For nRF Connect SDK < v3.0.0, a non-zero Project Key is required even if it is
not used. Set it to a dummy string such as "unset" to avoid a compiler error.
How do I override the NCS definition of memfault_metrics_heartbeat_collect_data() in order to add custom metric collection at the end of a heartbeat interval?
NCS provides an implementation of memfault_metrics_heartbeat_collect_data() to
collect built-in BLE, stack, and LTE metrics. In NCS versions >=2.6.0, users
can set CONFIG_MEMFAULT_NCS_IMPLEMENT_METRICS_COLLECTION=n to define their own
version of this function, and call into the NCS API to still do NCS metric
aggregation:
#include "memfault_ncs_metrics.h"
#include "memfault/components.h"

void memfault_metrics_heartbeat_collect_data(void)
{
  // Set custom metric values
  // ...

  // Call NCS metric collection
  memfault_ncs_metrics_collect_data();
}
For NCS versions <2.6.0, wrap the NCS implementation. In your
CMakelists.txt file:
zephyr_ld_options(-Wl,--wrap=memfault_metrics_heartbeat_collect_data)
Then, provide the wrapping:
#include "memfault/components.h"

extern void __real_memfault_metrics_heartbeat_collect_data(void);

void *__wrap_memfault_metrics_heartbeat_collect_data(void) {
  // Set custom metric values
  // ...

  // Call NCS-defined metric collection function
  __real_memfault_metrics_heartbeat_collect_data();
}