Zephyr Integration Guide
This tutorial will go over integrating the Memfault Firmware SDK into a system that is using Zephyr RTOS.
If you are using a Nordic Semiconductor chip and the nRF Connect SDK, take a look at the nRF Connect SDK Integration Guide for details specific to that setup!
Prerequisites
This guide assumes the following:
- Zephyr toolchain is setup on the host machine
- See the Zephyr getting started guide
- Knowledge of building and configuring Zephyr applications
- A target board with a supported architecture; any Cortex-M series device should be supported, for other architectures please contact us.
Supported Zephyr Versions
Memfault targets supporting new Zephyr releases as they arrive. If a version is not included below, please contact us and we'll let you know the status!
- ✅ >= v2.7.0, <= v4.1.0 tested and supported
Adding the Memfault Module
Adding the Memfault SDK to your project as simple as adding this snippet to your
west.yml:
        manifest:
          remotes:
            # Add the Memfault GitHub repo
            - name: memfault
              url-base: https://github.com/memfault
          projects:
            # Add the Memfault SDK
            - name: memfault-firmware-sdk
              path: modules/lib/memfault-firmware-sdk
              revision: 0.43.3
              remote: memfault
Depending on your project setup, the west.yml file may be in the application
repository (most common), or in a separate manifest repository. Read more about
supported development repositories here:
After updating the West Manifest, run 👉west update👈 to pull in the Memfault
SDK. Double check that you see the SDK source folder memfault-firmware-sdk
under modules/lib/.
Enabling Memfault
To enable Memfault, set the required Kconfig options:
# Memfault configuration
CONFIG_MEMFAULT=y
And the minimal dependency function, which should be added to your project
source (for example, in your main.c file):
#include <memfault/components.h>

// A hard-coded set of device information. In production, at minimum the
// device_serial would usually be device-specific and set at runtime.
void memfault_platform_get_device_info(sMemfaultDeviceInfo *info) {
  *info = (sMemfaultDeviceInfo){
      .device_serial = "DEMOSERIAL",
      .software_type = "zephyr-app",
      .software_version = "1.0.0-dev",
      .hardware_version = CONFIG_BOARD,
  };
}
Testing the Integration
The next step is to generate some Memfault data and verify it's decoded
correctly in the Memfault cloud. To do that, we first need to upload the
generated symbol file (for Zephyr projects, it's build/zephyr/zephyr.elf),
then trigger some test data collection on device, and then upload the data to
Memfault for analysis.
Upload Symbol File
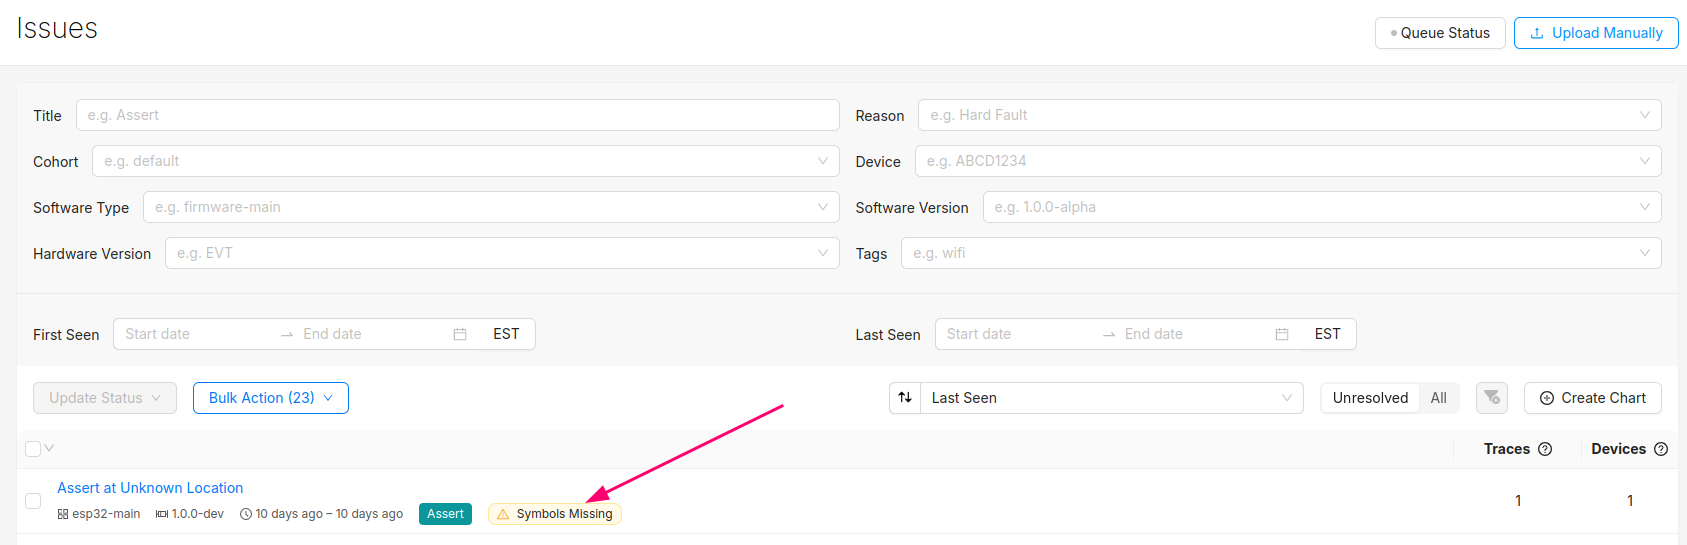
At this point, you should be able to generate test events and crashes and push the data to the Memfault UI.
You can confirm the error traces and crashes have arrived successfully by navigating to the "Issues" page- there should be a new issue with the "Symbols Missing" label:
Clicking into the Issue will show the trace and a message that the symbol file is missing. It can be uploaded by clicking the button highlighted below:
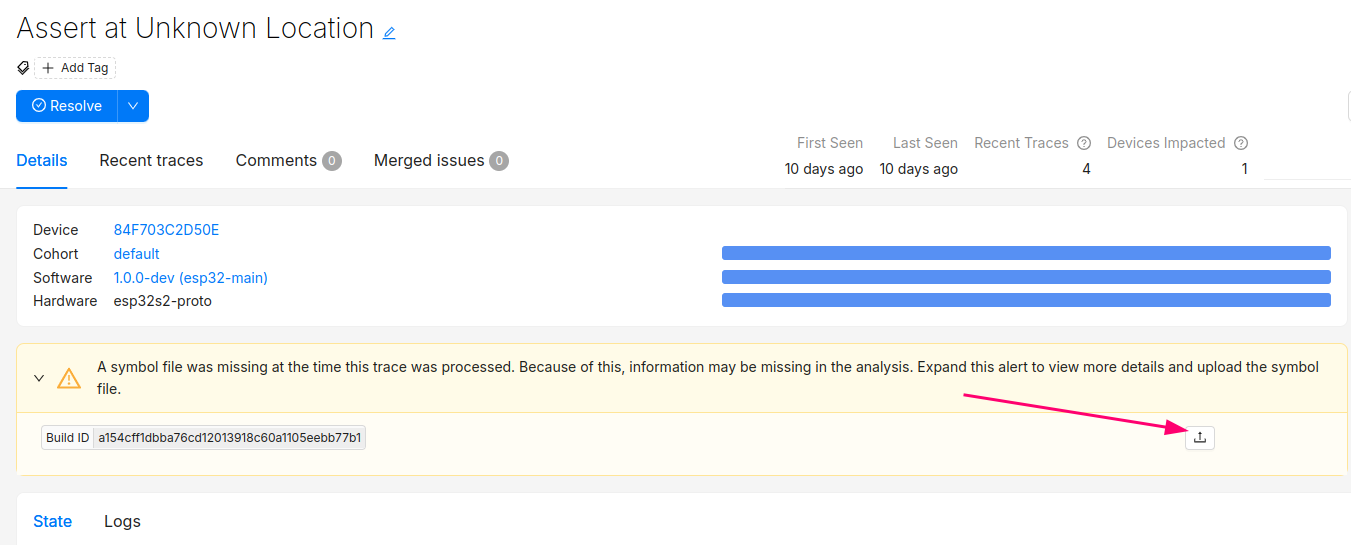
After this step, you will see the processed trace in the list of issues!
The Issue created when the symbol file is missing can now be set to resolved. It's good practice to always upload a symbol file before devices send any data.
Symbol files can also be uploaded from the Software → Symbol Files tab (follow this deep link to be brought to the symbol file upload point in the UI):
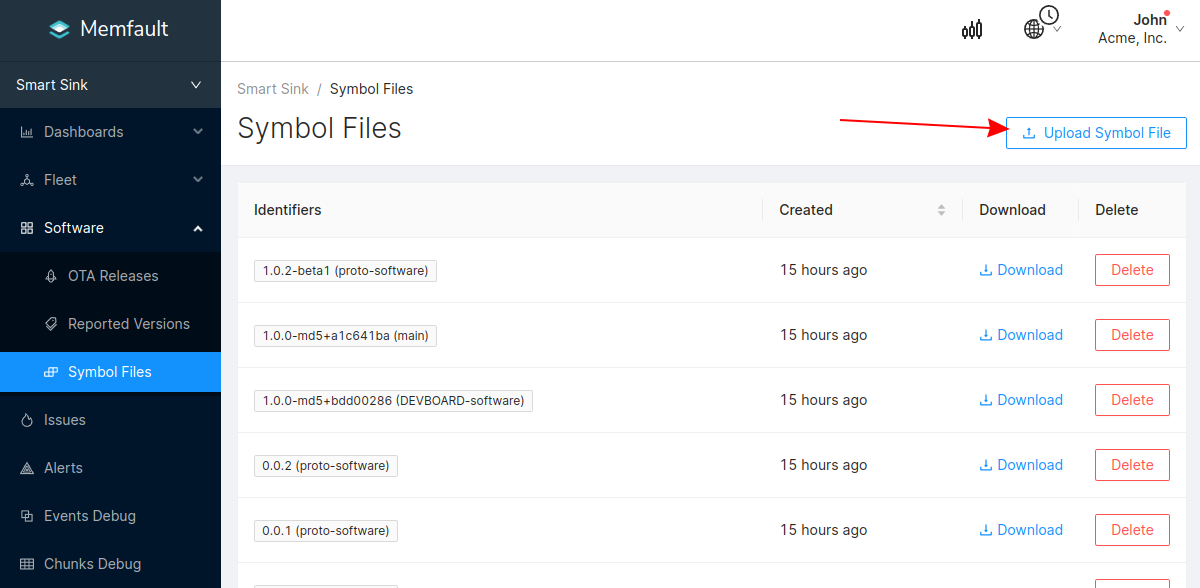
In addition to supporting decoding trace/coredump data, symbol files are also required for decoding Metrics.
You can programmatically upload symbol files with the Memfault CLI tool.
Symbol files should be uploaded to Memfault before devices send any data, to ensure all device data can be decoded.
Sending Data to the Memfault Cloud
If the project successfully builds, now we're ready to test the integration. If your board has console support, it's highly recommended to enable it for testing with the Memfault test commands:
CONFIG_CONSOLE=y

# this board has a uart console
CONFIG_UART_CONSOLE=y
CONFIG_SHELL=y

# enable logs as well
CONFIG_LOG=y
CONFIG_LOG_BACKEND_UART=y
CONFIG_MEMFAULT_LOGGING_ENABLE=y
Flash an application with the console enabled and open a serial terminal to run the test commands:
uart:~$ mflt
mflt - Memfault Test Commands
Subcommands:
  clear_core          :clear coredump collected
  export              :dump chunks collected by Memfault SDK using
                       https://mflt.io/chunk-data-export
  get_core            :check if coredump is stored and present
  get_device_info     :display device information
  get_latest_release  :checks to see if new ota payload is available
  post_chunks         :Post Memfault data to cloud
  test                :commands to verify memfault data collection
                       (https://mflt.io/mcu-test-commands)
uart:~$ mflt test
test - commands to verify memfault data collection
       (https://mflt.io/mcu-test-commands)
Subcommands:
  assert       :trigger memfault assert
  busfault     :trigger a busfault
  hang         :trigger a hang
  hardfault    :trigger a hang
  memmanage    :trigger a memory management fault
  usagefault   :trigger a usage fault
  zassert      :trigger a zephyr assert
  reboot       :trigger a reboot and record it using memfault
  Heartbeat    :trigger an immediate capture of all Heartbeat metrics
  log_capture  :trigger capture of current log buffer contents
  logs         :writes test logs to log buffer
  trace        :capture an example Trace Event
For example, run a crash example and dump Memfault chunks to the console output:
uart:~$ mflt test assert
*** Booting Zephyr OS build zephyr-v3.6.0  ***
[00:00:00.256,774] <inf> mflt: Reset Reason, RESETREAS=0x4
[00:00:00.256,805] <inf> mflt: Reset Causes:
[00:00:00.256,866] <inf> mflt:  Software
[00:00:00.258,026] <inf> mflt: GNU Build ID: 6b8ccbd9d4e8653cda0b0f7e75fc8c467431f68e
[00:00:00.258,056] <inf> main: Memfault Demo App! Board nrf52840dk_nrf52840

[00:00:00.258,117] <inf> mflt: S/N: DEMOSERIAL
[00:00:00.258,148] <inf> mflt: SW type: zephyr-app
[00:00:00.258,209] <inf> mflt: SW version: 1.0.0-dev
[00:00:00.258,270] <inf> mflt: HW version: nrf52840dk_nrf52840


uart:~$ mflt export
MC:SNgRgQlDT1JFAgYAA9wMFAABTAYAKQGAAABwLQAgIwoBAEhjACCcDwEAAQYAEU9IAQCALQAg/Ab/AQIOAAVMGwEKABNwLQAgq40AAKqNCgA=:
...
MC:SE4CpwICAwEKanplcGh5ci1hcHAJaTEuMC4wLWRldgZzbnJmNTI4NDBka19ucmY1Mjg0MAtGa4zL2dToBKUBGYABAhn7pAMaAAEKIwQEBQE=:
MC:gE4vFA==:
The chunks can be pasted into the Integration Hub / Chunks Debug panel within the Memfault web application.
Troubleshooting Data Transfer
If you encounter any issues in your data transfer implementation, Memfault has tools to help debug!
- To troubleshoot data not getting uploaded or processed correctly by the Memfault cloud, take a look at the Integration Hub → Processing Log view. This provides a filterable, chronological view of recent errors that have occurred while processing received data. See this documentation page for more information on the Integration Hub.
- A view you can use toview the raw "Chunk" data payloadsthat have arrived for your project.
- Precanned Data Payloads you can pass through your `user_transport_send_chunk_data()` implementation to test data transfer in isolation.
- Server-side rate limiting will apply to the device you're using to work on the integration process. Once you can see the device on the Memfault Web App, consider enabling Server-Side Developer Mode for it on the Memfault Web App to temporarily bypass these limits.
Memfault Configuration
The Memfault SDK is configured in two places:
- The normal Kconfig interface- see options defined for the
memfault-firmware-sdkmodule in one of the Kconfig interfaces, or check out the Kconfig file. These options apply to the Memfault Zephyr RTOS port contained within the Memfault SDK.
- https://docs.zephyrproject.org/4.0.0/build/kconfig/menuconfig.html
- https://github.com/memfault/memfault-firmware-sdk/blob/master/ports/zephyr/Kconfig
-
The Memfault SDK configuration files, which contain configuration options for the SDK that are not Zephyr-specific. See the below files:
-
memfault_platform_config.h- See thedefault_config.hfile in the Memfault SDK for documentation -
memfault_metrics_heartbeat_config.def- See the docs page for using this file. -
memfault_trace_reason_user_config.def- See the docs page for using this file
noteBe sure the directory containing the configuration files is added to the Zephyr search directories:
zephyr_include_directories(config)The Memfault SDK will silently ignore missing configuration files by default (see the
CONFIG_MEMFAULT_USER_CONFIG_SILENT_FAILKconfig option, which when disabled will cause a build error if any configuration files are missing from the compiler search path). -
Built-in Zephyr Metrics
The Memfault SDK provides a number of built-in metrics for Zephyr projects including:
| Metric Name | Description |
|---|---|
AllTasksCpuUsage | Aggregate CPU usage across all tasks |
boot_time_ms | Time spent booting in milliseconds |
cpu_usage_pct | Total CPU active percentage |
FileSystem_BytesFree | Free bytes available in the file system |
Heap_BytesFree | Number of free bytes in the heap |
memory_pct_max | Maximum heap utilization since boot |
net_bytes_received | Total bytes received over the network |
net_bytes_sent | Total bytes sent over the network |
net_tcp_recv | Number of TCP packets received |
net_tcp_sent | Number of TCP packets sent |
net_udp_recv | Number of UDP packets received |
net_udp_sent | Number of UDP packets sent |
thermal_cpu_c | Current CPU temperature in Celsius |
TimerTaskCpuUsage | CPU usage percentage of the timer task |
TimerTaskFreeStack | Free stack space available for the timer task |
wifi_ap_oui | The OUI of the Wi-Fi AP the device is connected to |
wifi_beacon_interval | Wi-Fi beacon interval |
wifi_connected_time_ms | Time in milliseconds the device has been connected to a Wi-Fi network |
wifi_disconnect_count | Number of times the device has disconnected from a Wi-Fi network |
wifi_dtim_interval | Wi-Fi DTIM interval |
wifi_frequency_band | Wi-Fi frequency band |
wifi_primary_channel | Wi-Fi primary channel |
wifi_security_type | Wi-Fi security type |
wifi_sta_rssi | Wi-Fi station RSSI |
wifi_standard_version | Wi-Fi standard version |
wifi_twt_capable | Wi-Fi TWT (Target Wake Time) capability |
wifi_tx_rate_mbps | Wi-Fi TX rate in Mbps (Zephyr 4.1.0+ only) |
Check the Memfault menuconfig options for details on enabling those metrics.
Zephyr __ASSERT()
Zephyr RTOS has a built-in runtime assert system, see more information here:
Memfault's coredump capture routine will be triggered when the system encounters
a failing __ASSERT(), however, by default, Zephyr asserts are disabled at
build time. To enable them, set the CONFIG_ASSERT=y Kconfig variable:
# Memfault will record crashes due to Zephyr asserts. Enabling them means it's
# possible to root cause the problems on fielded devices 🎉 !
CONFIG_ASSERT=y
OTA updates with MCUboot backend
Memfault provides an OTA client for Zephyr applications. This client performs OTA updates by downloading a payload hosted with Memfault into a secondary partition managed by MCUboot.
To use this client for your application:
-
Set the Kconfig
CONFIG_MEMFAULT_ZEPHYR_FOTA_BACKEND_MCUBOOT=yand rebuild to ensure there are no build errors or unmet Kconfig dependencies. -
Upload an OTA payload to your project in Memfault with a version greater than the one on the device. For testing purposes, upload the confirmed binary
build/zephyr/zephyr.signed.confirmed.bin. Use the Memfault CLI to easily do this from the command line with theupload-ota-payloadcommand. See the OTA Management page for more information.noteIn production, the OTA payload uploaded should be an unconfirmed image (
build/zephyr/zephyr.signed.bin) that is confirmed by the firmware after essential functionality has been tested. Once the new image is confirmed, the device will always boot into it, otherwise the device will revert to the old image. For more information, see the Device Firmware Upgrade subsystem. -
Activate the release for the Cohort your test device is in. Use the
deploy-releasecommand if using the CLI. -
Confirm that a new OTA update is available by using the Memfault Demo CLI command
mflt get_latest_url. If you get a "Up to date!" message, confirm that the software version returned bymflt get_device_infois less than the one in the uploaded release. -
Perform the update with
mflt get_latest_release. If successful, the device will reboot into the new image after download.
To perform this check and update automatically, call
memfault_zephyr_fota_start() as part of scheduled work that will be triggered
periodically. For example:
#include <zephyr/kernel.h>

#include "memfault/ports/zephyr/fota.h"

// [...]

// Periodic work handler
void prv_ota_check_work_handler(struct k_work *work) {
  // Should not return if download is successful
  int rv = memfault_zephyr_fota_start();
  if (rv != 0) {
    // Retry logic
  }
}
Reference Examples
Memfault provides two different Zephyr examples. See the links below for documentation and usage information.
-
Zephyr example with networking enabled, targeting the STM32L4 Discovery Kit for IoT Node (B-L475E-IOT01A):
-
Non-networked example, can be used with any Cortex-M board (default board is
qemu_cortex_m3):
Software Bill of Materials (SBOM) Generation
Zephyr provides a west utility to generate an SBOM in SPDX format:
To generate an SBOM for your project, follow these steps:
-
Generate the SPDX files:
# NOTE: for sysbuild projects, the build directory will be "build/<application>"
# NOTE: start with a clean build, i.e. "rm -rf build"
$ west spdx --init --build-dir=build
$ west build --pristine always ...
$ west spdx --build-dir=build
The SPDX documents will be generated into the build directory under a directory named
spdx:build/spdx
├── app.spdx
├── build.spdx
├── modules-deps.spdx
└── zephyr.spdx -
Merge the files into a single document. This can be done with the
spdxmergeutility:# install the utility
$ pip install spdxmerge
# merge the SPDX documents. arguments are example values, adjust as needed.
# NOTE: merge type is "1" for deep merge
$ spdxmerge \
--name "Product Name" \
--author "Author Name" \
--email "author@email.net" \
--docnamespace "https://spdx.organization.name" \
--filetype t \
--mergetype 1 \
--docpath build/spdx --outpath build/spdx
File spdx/merged-SBoM-deep.spdx is generated -
The merged file has a minor error that causes it to fail SPDX validation. Correct it by opening it and find-replacing the fields in question, or use the
sedutility:$ sed 's/FilesAnalyzed: True/FilesAnalyzed: true/' -i build/spdx/merged-SBoM-deep.spdx
The output file, build/spdx/merged-SBoM-deep.spdx, is the one to upload to
Memfault.