Bort AOSP Integration
The following guide will walk you through step-by-step how to integrate and validate Memfault's Bort SDK in your custom AOSP project.
1. Create a Project
Create a Project and get a Project Key
Go to app.memfault.com and from the "Select A Project" dropdown, click on "Create Project" to setup your first project. Choose a name that reflects your product, such as "smart-sink-dev".
Select "Android (AOSP)" as your Project Type.
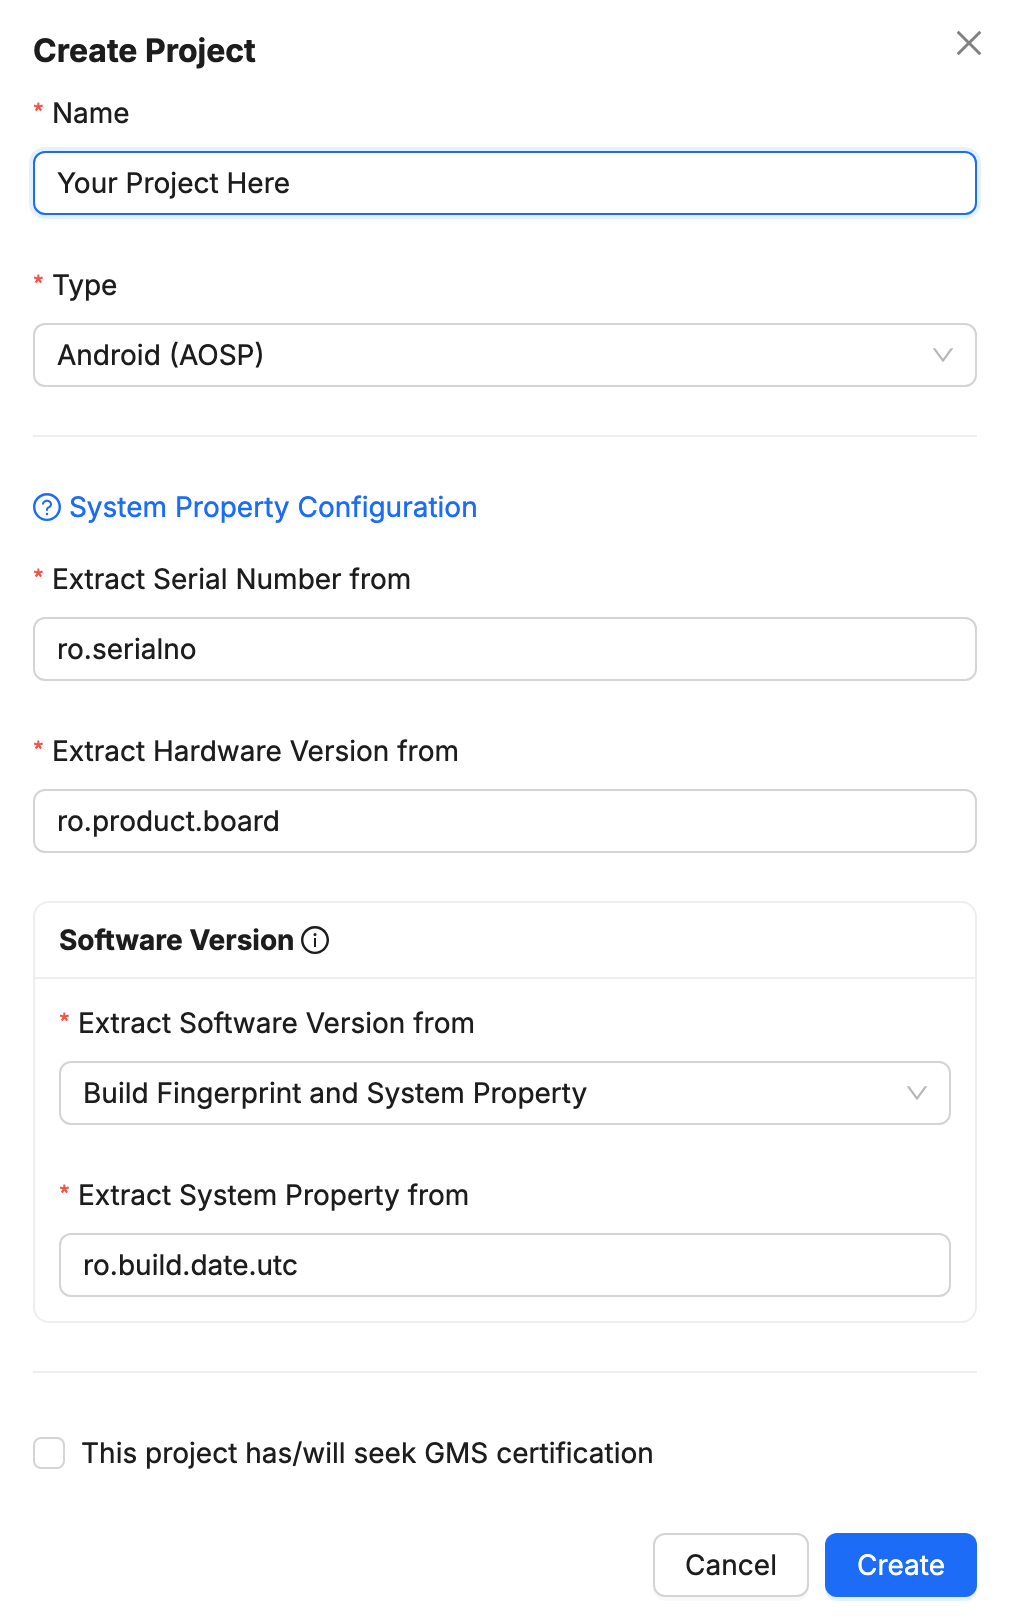
By default, the Device's Serial Number is used as the Device ID, collected from the ro.serialno system property. Make sure that it is unique for every device in the same Project.
See our reference documentation on Hardware and Software Versions for further details about how to choose the right versions for your project. Note that these settings cannot be changed once the project is created!
Once you've created your project, you'll be automatically taken to an page that includes your project key. Copy the key and follow the rest of this guide.
2. Build your AOSP project with the Bort SDK integrated
i. Clone the Bort SDK into your project
Using a Git client, clone the bort repository from:
git clone https://github.com/memfault/bort.git
Add this repo to your tree at vendor/memfault/bort (i.e. add it to your repo
manifest).
ii. Include Bort's SDK into your project Makefiles
We recommend placing the includes below at the end of the respective
Makefiles. This is because include directives are used to append to
variables in the build script; placing them at the end of the file reduces the
chances that subsequent lines in the Makefile do not redefine those variables
and discard the effect of the include. If it is not possible to place the
include at the end of the file, ensure that the respective variables are not
redefined (look for the := syntax).
Add this line to your device.mk file to get the components included in your
build; this appends to the PRODUCT_PACKAGES variable:
include vendor/memfault/bort/product.mk
Add this line to your BoardConfig.mk file to get the sepolicy files picked up
by the build system; this appends to the BOARD_SEPOLICY_DIRS and
BOARD_PLAT_PRIVATE_SEPOLICY_DIR variables:
include vendor/memfault/bort/BoardConfig.mk
iii. Patch AOSP
Apply AOSP patches using
the bort_cli.py tool (requires Python 3.6+). Be sure to call this using the
correct Android OS version (--android-release) for your build.
vendor/memfault/bort/bort_cli.py patch-aosp \
  --android-release 10 \
  <AOSP_ROOT>
iv. Patch Bort's application ID
Decide on an application ID for the Bort application. We recommend placing the
application under your domain, and appending bort to your
reverse domain name
in some fashion. For example, com.mycorp.bort.
If you're using the OTA Update Client, the OTA
application ID must also be set. For example, com.mycorp.bort.ota.
OTA must be explicitly enabled — instructions here.
Patch Bort with your own application IDs:
vendor/memfault/bort/bort_cli.py patch-bort \
  --bort-app-id <YOUR_BORT_APPLICATION_ID> \
  --bort-ota-app-id <YOUR_BORT_OTA_APPLICATION_ID> \
  <AOSP_ROOT>/vendor/memfault/bort/MemfaultPackages
This command will patch bort.properties, setting the BORT_APPLICATION_ID
(and BORT_OTA_APPLICATION_ID) properties to <YOUR_BORT_APPLICATION_ID> and
YOUR_BORT_OTA_APPLICATION_ID.
v. Configure bort.properties
You must set your Project Key in the Bort app. This is set in
MemfaultPackages/bort.properties; the app will not compile without this
property.
If your devices will have
Google Mobile Services (GMS) and must
run the
Compatibility Test Suite (CTS),
you may need to update the Bort target SDK version to match the API level of
your OS. This can be done by updating the TARGET_SDK_VERSION property in
MemfaultPackages/bort.properties.
Additional settings can be configured via the Bort SDK over-the-air SDK settings system.
vi. Create a keystore for the Bort SDK
Bort app
The Bort app requires a Java keystore file so that the app can be signed.
To generate a keystore, run the following command in the
<AOSP_ROOT>/vendor/memfault/bort/MemfaultPackages directory:
$JAVA_HOME/bin/keytool -genkeypair -alias release_key -keypass secretPassword -keystore bort_keystore.jks -storepass secretPassword -validity 10000 -keyalg rsa
Make sure to change the secretPassword to a uniquely generated password and
store that password securely. Please note that the -keypass and -storepass
must be the same.
Alternatively, instructions on how to create a keystore in Android Studio can be found here. If you plan to update the app via the Play Store, you may wish to follow the additional instructions on that page.
- The key that is used to sign the Bort app must NOT be the platform signing key, otherwise the SDK will not function correctly.
- The key must ONLY be used to sign the Bort app and no other apps. Special permissions are assigned to Bort based on the signing certificate.
Once you have a keystore, set up a keystore.properties file and provide the
path to it via the bort.properties file:
BORT_KEYSTORE_PROPERTIES_PATH=keystore.properties
The keystore.properties file must contain these properties with the
appropriate values:
keyAlias=release_key # e.g. key0
keyPassword=secretPassword
storeFile=bort_keystore.jks
storePassword=secretPassword
OTA Update Client app
This step is only required if you are using the OTA Update Client.
If using the OTA Update Client, a separate keystore should be created, following the same steps as for the Bort app.
Once you have a keystore, set up a ota_keystore.properties file and provide
the path to it via the bort.properties file:
BORT_OTA_KEYSTORE_PROPERTIES_PATH=ota_keystore.properties
If using OTA, then this must be explicitly enabled - instructions here.
vii. Build the Bort SDK APKs
Build the Bort APK
The MemfaultBort app is built using gradle. Building the release APK will
automatically invoke a task to copy the resulting APK and place it in the root
directory where it will be picked up by the AOSP build system.
Building Bort with gradle requires the Android SDK location to be configured.
This can either be set with the ANDROID_HOME environment variable, or by
opening the project with Android Studio (e.g. opening the root build.gradle)
which will auto-generate a local.properties file with the sdk.dir property.
We recommend installing Android Studio,
which will automatically install many Android SDK tools.
cd MemfaultPackages && ./gradlew :bort:assembleRelease
This will create a signed MemfaultBort.apk and MemfaultBort.x509.pem file.
The pem file is a public certificate used by the system when enforcing the SE
policy.
Build the OTA Update Client APK
The MemfaultBortOta app is built using gradle. Building the release APK will
automatically invoke a task to copy the resulting APK and place it in the root
directory where it will be picked up by the AOSP build system.
cd MemfaultPackages && ./gradlew :bort-ota:assembleRelease
This will create a signed MemfaultBortOta.apk and MemfaultBortOta.x509.pem
file. The pem file is a public certificate used by the system when enforcing
the SE policy.
Build the UsageReporter APK
The MemfaultUsageReporter app is built using gradle. Building the release APK
will automatically invoke a task to copy the resulting APK and place it in the
root directory where it will be picked up by the AOSP build system.
cd MemfaultPackages && ./gradlew :reporter:assembleRelease
Build all APKs at once (Recommended)
All of the above APKs can be built using a single command! We recommend using the full command and letting gradle automatically optimize the recompilation.
cd MemfaultPackages && ./gradlew assembleRelease
viii. Compile and run the AOSP image on your device
After the Bort APKs are built and the Makefiles are included in your AOSP project, compile your AOSP image, and flash it to your device.
By default, Memfault expects the MemfaultBort.apk,
MemfaultUsageReporter.apk, and MemfaultBort.x509.pem files to exist in the
vendor/memfault/bort/MemfaultPackages folder, so the Bort and UsageReporter
apps can be installed in the AOSP image.
If using OTA, the MemfaultBortOta.apk and MemfaultBortOta.x509.pem must also
exist in that folder.
Building these APKs using gradle will automatically copy the apk and certificates to the correct location, but you can define your own process as long as those files are written to that location before the image AOSP is built.
3. Validate the Bort SDK integration
The bort_cli.py tool can also be used to check for issues with the SDK
installation. To use it, install a build containing the Bort SDK on a device
that you wish to validate. Connect that device via ADB (verify via
adb devices) and run the script:
./bort_cli.py validate-sdk-integration --bort-app-id your.app.id
If using the Bort OTA client, then run the validation tool with an additional argument for the OTA app ID. This is supported from Bort 4.12.0 onwards:
./bort_cli.py validate-sdk-integration --bort-app-id your.app.id --bort-ota-app-id your.ota.app.id
We recommend running the validation tool with a userdebug system image. A
user image does not allow all checks to be run, which may result in Bort
configuration issues being missed.
If you have multiple devices connected, use the --device flag to specify the
target device. For more information on the different options, run the command
with the -h flag:
./bort_cli.py validate-sdk-integration -h
4. Collect your first device metrics
i. Enable the Bort SDK
By default, the Bort SDK will only run after being explicitly enabled at runtime
(RUNTIME_ENABLE_REQUIRED=true) — this is to ensure no data is collected
without user consent.
Additional information on enabling the SDK can be found in the Enabling the SDK at Runtime section of the Bort SDK documentation.
For the purposes of testing the SDK on a development device, the SDK can be enabled via ADB using the CLI tool:
./bort_cli.py enable-bort --bort-app-id your.app.id
The enable-bort command runs this ADB command under the hood:
adb shell am broadcast --receiver-include-background \
  -a com.memfault.intent.action.BORT_ENABLE \
  -n your.app.id/com.memfault.bort.receivers.ShellControlReceiver \
  --ez com.memfault.intent.extra.BORT_ENABLED true
ii. Trigger metrics collection from Bort manually
You can request a Metrics collection using the bort_cli.py tool as well. To
enable these debugging utilities, we must first enable Developer Mode.
Developer Mode (since Bort 4.2.0)
On local development/test devices, Bort can be placed into developer mode. This can be useful for testing the Bort integration or testing newly added Custom Metrics.
Once in developer mode:
- Random upload jitter is removed (this is helpful to see diagnostic information in the Memfault dashboard immediately).
marfiles are uploaded immediately (instead of waiting to be bundled in a single upload, as it normally would).- Metrics collection can be triggered on-demand. This will trigger Bort to
collect
batterystatsand Metrics - useful for validating new calls to the Reporting APIs. - Device configuration update can also be requested on-demand. This will trigger Bort to update settings from the Memfault server, including the fleet-sampling configuration.
- From Bort 4.5.0 onwards: All client-side rate limits are bypassed. Server-side rate-limits may still be in effect.
To enable developer mode (change true to false to disable):
./bort_cli.py dev-mode --bort-app-id your.app.id --enabled true
Then, request a metrics collection using:
./bort_cli.py request-metrics --bort-app-id your.app.id
Next Steps
Activate your first OTA update
Collect your first Metrics
Request a test bug report
Once the SDK has been enabled, you can manually trigger a bug report to be generated. Once generated, it will be automatically uploaded to Memfault:
./bort_cli.py request-bug-report --bort-app-id your.app.id
More information on triggering a bug report can be found in Triggering A Bug Report Programmatically; more information on when bug reports are automatically captured can be found in Bug Report Capture Period.
Once the bug report has been generated, uploaded and processed successfully, you
will be able to find it in Memfault by navigating to the Fleet → Devices view
and finding the device that uploaded the bug report.
If you do not see the bug report, you can check your project's Processing Log under the "Integration Hub" sub-menu. The Processing Log contains details on what data has been received and processed by Memfault, as well as any error that may have occurred.
A bug report's status will remain as Stored if the maximum number of bug
reports that will be analyzed from a device per day is reached.
Quotas can be accessed from
Settings → Quotas.
When a bug report is Processed, the results of analysis can be viewed from the
respective Issue page.
Troubleshooting
See Troubleshooting.