JWT authentication for nRF Cloud
This guide demonstrates how to authenticate requests to the nRF Cloud REST API using JSON Web Tokens (JWTs). For references and concepts, see the JWT section of the REST API authentication documentation.
For cloud-to-cloud Location Services authentication with a proxy server, use an Organization Auth Token (OAT) instead of a JWT. For setup instructions, see the Location Services Quickstart.
This guide is not a tutorial, and does not model real-world use cases with specific hardware. Instead, this guide provides a conceptual understanding of JWT authentication on nRF Cloud using tokens that you generate using an online tool.
Prerequisites
You need the following for this guide:
- An nRF Cloud account.
- A unique device ID, preferably a UUID. You can obtain one using the Online UUID Generator.
Key extraction from a device certificate
For JWTs involving a device that is onboarded to nRF Cloud, the public key is extracted from the certificate and stored to nRF Cloud to verify the signatures of JWTs signed by the certificate's private key.
To extract the public key:
-
Use the scripts in the nRF Cloud Utils project to create a CA certificate and a device certificate. These steps use NodeJS scripts, but the Utils project also provides Python scripts. If you do not want to use the scripts directly, you can use OpenSSL commands with a few modifications:
export DEVICE_ID=<Device_ID> -
Use a subject and organizational unit (
ou) of your choice:node dist/create-ca-cert.js --cnSubjectPrefix '/C=NO/ST=Norway/L=Trondheim/O=Nordic Semiconductor' --ou 'Test Devices' -
Create the device certificate using the CA certificate:
node dist/create-device-cert.js --deviceId $DEVICE_IDnoteIf you are using an nRF9160 DK, inject the certificate to the device.
-
Following the documentation for the
OnboardDevicesendpoint, create a CSV file that contains the certificate that you just created. This is the PEM-formatted string in the*.crt.pemfile. -
Call the
ProvisionDevicesendpoint to upload the CSV data. The following example shows CSV data encoded as a base64 string:export API_KEY=<your API key>curl --request POST \--url https://api.nrfcloud.com/v1/devices \--header 'Authorization: Bearer $API_KEY' \--header 'content-type: text/csv' \--data ZjY5YzBlNDUtN2YwNC00OTQ5LThkZWYtYmIyMjE1YjQyMjNlLG15LXRoaW5nLXR5cGUsdGFnMXx0YWcyLEFQUHxNT0RFTSwiLS0tLS1CRUdJTiBDRVJUSUZJQ0FURS0tLS0tCk1JSUI0VENDQVlnQ0NRQ2EyWkxudGk5dFpEQUtCZ2dxaGtqT1BRUURBakJvTVFzd0NRWURWUVFHRXdKT1R6RVAKTUEwR0ExVUVDQXdHVG05eWQyRjVNUkl3RUFZRFZRUUhEQWxVY205dVpHaGxhVzB4SFRBYkJnTlZCQW9NRkU1dgpjbVJwWXlCVFpXMXBZMjl1WkhWamRHOXlNUlV3RXdZRFZRUUxEQXhVWlhOMElFUmxkbWxqWlhNd0lCY05NakV3Ck9ERTVNakExTWpRM1doZ1BNakExTVRBNE1USXlNRFV5TkRkYU1JR0hNUXN3Q1FZRFZRUUdFd0pPVHpFU01CQUcKQTFVRUNBd0pWSEp2Ym1SbGJHRm5NUkl3RUFZRFZRUUhEQWxVY205dVpHaGxhVzB4SVRBZkJnTlZCQW9NR0U1dgpjbVJwWXlCVFpXMXBZMjl1WkhWamRHOXlJRUZUUVRFdE1Dc0dBMVVFQXd3a1l6WTFNbVk1WVdRdFpUQmlPUzAwCk9HWm1MV0pqTmpJdE1qSXdPREZqT0RBME1UVTRNRmt3RXdZSEtvWkl6ajBDQVFZSUtvWkl6ajBEQVFjRFFnQUUKQnM5SC9BRG1tNTZuZS90OW9FT1BhRWtHVzNOczllaGtpVUVwbXgxbjdpQWwyRVRKYm5hcGZ6NklWWHVwa3ZtSApDQlBKRU1UWVR3Mnc2bisrMGV1Zkd6QUtCZ2dxaGtqT1BRUURBZ05IQURCRUFpQnpBc3ZyNzZpK0x1TFR2QndGCm5vTy9LQUh6bmJhTE1DLzlwU25mSi9HWitRSWdOZStWcXd0aUNuMzlIRnUyb3NDaElzRlVSTWtvNGl0VWIwOFcKUWFtZHM5QT0KLS0tLS1FTkQgQ0VSVElGSUNBVEUtLS0tLQoi -
This returns a
bulkOpsRequestIdthat you can use to check the status of the bulk operations request using theFetchBulkOpsRequestendpoint:curl --request GET \--url https://api.nrfcloud.com/v1/bulk-ops-requests/$BULK_OPS_REQUEST_ID--header 'Authorization: Bearer $API_KEY' -
Create a JWT using the private key of the device certificate. To do this without writing code, go to jwt.io.
If you have an nRF9160 DK, you can create a JWT using the
%JWTAT command.noteUsing AT commands can depend on the application or sample you are using. See the application or sample README for more information on using AT commands.
-
The jwt.io cryptographic algorithm for JWT signing defaults to HS256. Select
ES256from the Algorithm menu: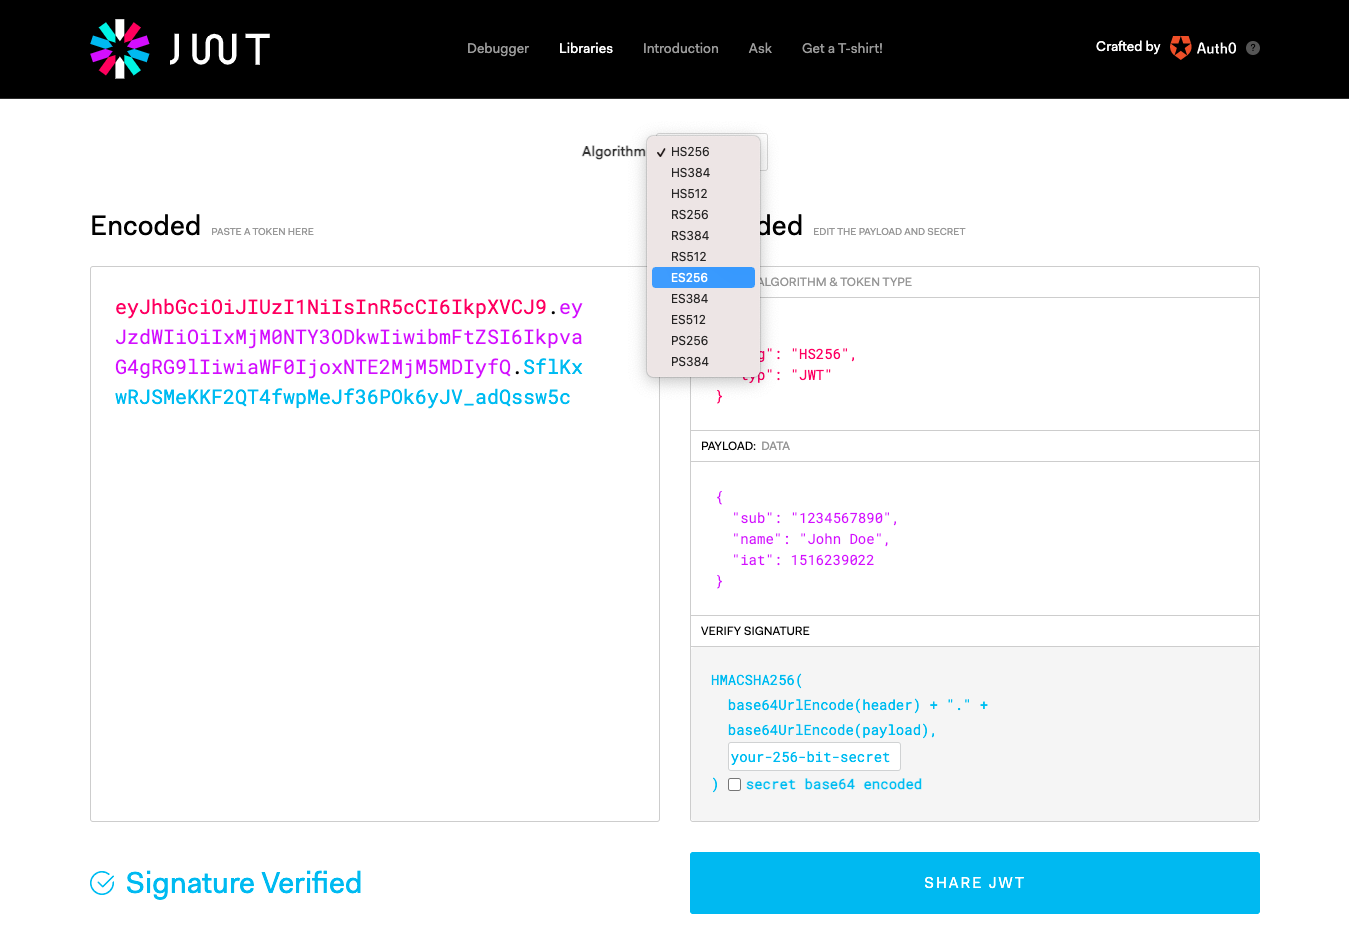
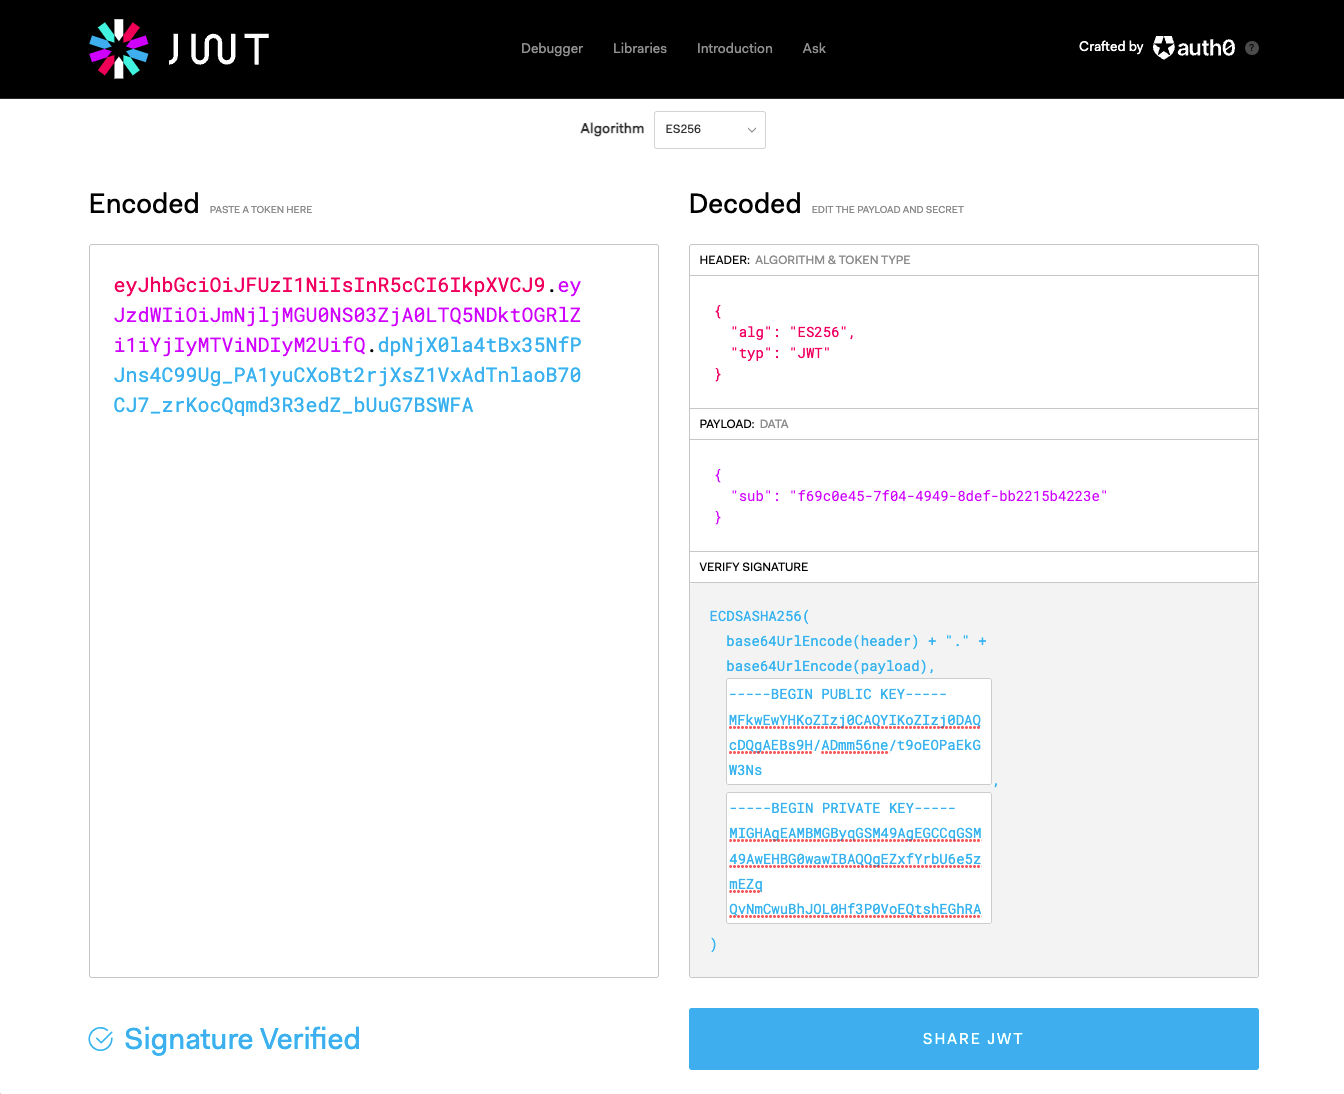
-
Edit the payload for the device key:
{"sub": "f69c0e45-7f04-4949-8def-bb2215b4223e"}noteThe modem library uses
issifsubis not passed to theAT%JWTcommand. If you want to useiss, you must also add a hardware type such asnrf9160.to the start of the device ID. For example:{"iss": "nrf9160.f69c0e45-7f04-4949-8def-bb2215b4223e"} -
Copy the contents of your
*.key.pemfile and paste it to the lower right field of the Verify Signature pane:
-
The text in the left pane changes to the JWT encoded as a base64 string. You can now present this token when calling an nRF Cloud REST API endpoint that accepts JWTs, allowing the API to authenticate the request.
note::: The
Invalid Signaturewarning appears because the public key in the right pane is the default key for the jwt.io sample. It is not the public key corresponding to your private key, and therefore signature verification fails.Example:
This example uses the files generated for the device ID in the previous steps:
openssl x509 -pubkey -noout -in ./certs/$DEVICE_ID.crt.pem > ./certs/$DEVICE_ID.public-key.pemThis results in:
-----BEGIN PUBLIC KEY-----MFkwEwYHKoZIzj0CAQYIKoZIzj0DAQcDQgAEBs9H/ADmm56ne/t9oEOPaEkGW3Ns9ehkiUEpmx1n7iAl2ETJbnapfz6IVXupkvmHCBPJEMTYTw2w6n++0eufGw==-----END PUBLIC KEY-----noteThe blank line below the text is part of the PEM format and must be kept.
-
Paste this information into jwt.io to verify the token's signature:
-
Use the JWT you have created to authenticate a request to an nRF Cloud endpoint that requires JWTs. This example calls the
GetAssistanceDataendpoint using the JWT:curl --request GET \--url 'https://api.nrfcloud.com/v1/location/agnss?requestType=custom&customTypes=1%2C3%2C4%2C6%2C7%2C8%2C9&mcc=310&mnc=410&tac=36874&eci=84485647' \--header 'Accept: application/octet-stream' \--header 'Authorization: Bearer eyJhbGciOiJFUzI1NiIsInR5cCI6IkpXVCJ9.eyJzdWIiOiJmNjljMGU0NS03ZjA0LTQ5NDktOGRlZi1iYjIyMTViNDIyM2UifQ.VRXRvIAxrdNml4zzUHboaE3oSFbjtUwAEa8QN2DuWrTsIUVVlmZFapY93w-ocwS5SpEdXFP8twMB3T8xTunGsQ' \--header 'range: bytes=0-500'
The expected response is in binary format with an HTTP 206 status code. This indicates that your request was authenticated. An HTTP status code of 401 indicates an authorization failure. See more on HTTP error codes.
Public key registration
The previous example signed JWTs using the private key associated with the device certificate, and verified the JWT signatures with the corresponding public key extracted from the certificate during the nRF Cloud onboarding process.
Your implementation might require that your device is provisioned on another IoT platform but still needs to call JWT-authenticated endpoints, for example, nRF Cloud Location Services. In this case, register the public key of each device's asymmetric key pair with nRF Cloud:
-
Create a key pair using OpenSSL:
openssl ecparam -out private-key.pem -name prime256v1 -genkeyopenssl ec -in private-key.pem -outform PEM -pubout -out public-key.pemYou should now have two files containing the private and public keys of an asymmetric key pair in PEM format:
# private-key.pem-----BEGIN EC PARAMETERS-----BggqhkjOPQMBBw==-----END EC PARAMETERS----------BEGIN EC PRIVATE KEY-----MHcCAQEEIJjdPMD9lReeM+ixAkch0p7OQcDgqmdy8ZM1Ck4g/tX1oAoGCCqGSM49AwEHoUQDQgAEmw+7td4SD8LAvRs3cDZu8clz0zJpuvhTmYSBRL6YP72nAIw82DCpbBp8VFheVg2OeDO172Hvv+H8OAf9xHMoOg==-----END EC PRIVATE KEY-----# public-key.pem-----BEGIN PUBLIC KEY-----MFkwEwYHKoZIzj0CAQYIKoZIzj0DAQcDQgAEGjAfgCvLVs5HUZoK/O2TN3ZjgyxuajMH+V3QNvAsyXFIM+CjfdjenQWcuww5CRX/kDwFEdILyE+jdScVbulkhw==-----END PUBLIC KEY-----noteIn a real-world use case, key generation is handled by the nRF9160 modem through the
%KEYGENAT command.The blank line below the text in each file is part of the PEM format and should be retained.
-
Create a CSV file that contains the public key that you just created, according to the
RegisterPublicKeysendpoint reference. -
Call the
RegisterPublicKeysendpoint to upload the data:curl --request POST \--url https://api.nrfcloud.com/v1/devices/public-keys \--header 'Authorization: Bearer $API_KEY' \--header 'content-type: text/csv' \--data ZjY5YzBlNDUtN2YwNC00OTQ5LThkZWYtYmIyMjE1YjQyMjNlLC0tLS0tQkVHSU4gUFVCTElDIEtFWS0tLS0tCk1Ga3dFd1lIS29aSXpqMENBUVlJS29aSXpqMERBUWNEUWdBRUdqQWZnQ3ZMVnM1SFVab0svTzJUTjNaamd5eHUKYWpNSCtWM1FOdkFzeVhGSU0rQ2pmZGplblFXY3V3dzVDUlgva0R3RkVkSUx5RStqZFNjVmJ1bGtodz09Ci0tLS0tRU5EIFBVQkxJQyBLRVktLS0tLQo=qSee the previous example regarding use of the
bulkOpsRequestId. -
Repeat the previous steps for jwt.io, using the private and public keys from this example to create a JWT.
-
Use the JWT to authenticate a request to any nRF Cloud endpoint that specifies
JSON Web Tokenin its Authorizations section.
Next steps
For real-world use of JWTs from actual devices, see Securely generating credentials for nRF91 Series devices.